The fall of Bali and the naval battle of the Badoeng Strait
18 - 20 of February of 1942
By: Felipe C. Ramires
Strategic context
The island of Bali is considered to be one of the best tropical paradises of
the Indonesian archipelago. Located in the Lesser Sundas archipelago, with the
Indian Ocean to the south and the Flores Sea to the north, this small volcanic
island of 5591 Km2 is situated only a few miles off the eastern coast of the
island of Java. It gives any visitor an excellent exotic-tropical environment,
very important traces of the ancient Indonesian Hindu civilisation, small and
magnificent beaches like the Beach of Kuta and the warm waters of the Bali,
Badoeng and Lombok Straits. However, most people would never imagine that in
one day, those beaches would be the stage of the disembarkation of the Japanese
invaders and that soon after these calm waters would be the scene of the second
naval battle fought between the Allied forces (ABDA) and the Japanese strike
forces, in the first phase of the Pacific Campaign.
After the Pearl Harbour attack on the 7th of December of 1941, all the Japanese
armed forces initiated an expansion campaign to all Southeast Asia, Philippines
and the Indonesian archipelago, an expansion that would be known as the Japanese
"blitzkrieg". The recent and badly organised Allied force (ABDA), formed
to put up some resistance to the Japanese tentacles, could do little or nothing
to stop it and besides that it suffered heavy casualties in the air, land and
sea. The Japanese ambition and the desperate necessity of getting raw materials
(oil, rubber and timber), in abundance from the region, were the principal motivation
that led the Japanese Empire to take this initiative, later crowned with success.
On the 10th of February 1942 the Japanese completed the conquest of the island
of Borneo with the capture of Bandjarmasin and with the securement of an airfield
at Balikpapan. Makassar and Kendari in the Celebes islands were taken respectively
on the 8th and the 10th of February and they could give them excellent naval
and aerial support bases. On the 14th of February another Japanese disembarkation
occurred on the west coast of Sumatra Island, the oil refineries and the air
base of Palembang secured in this island formed another strong support base
for the next attacks. The island of Java, where the great part of the Allied
forces were concentrated, was the main target and since it was already surrounded
from the west and north it was needed to do it also by east. Bali then became
involved in this strategic context and it was more then vital to the Japanese
to take over the island to secure a final offensive with success.
Beyond the geographic proximity of Java, the island of Bali also interested
the Japanese with the fact that there was one important airfield in Den Passar,
the biggest city in the island. Even occupied by the Dutch it was more than
essential to take the airfield intact because it could give an excellent capacity
of aerial support and control in the involved zone. It would be easier for the
Japanese to set off air raids to Soerabaja and to Tjilatjap, important Allied
naval bases, and to the Allied airfields of Blimping, Perak and Madaen. The
already taken airfields of the Borneo and Celebes islands could do the same
function but due to the great distance and to the adverse climatic conditions
the flight operations in these bases were much more limited. Bali offered much
dryer weather and other favourable conditions to a continuous aerial support
campaign. There was also the necessity of interception of the current Allied
fighter flights from Australia to Java and with one fighter-interception force
at Bali it would be much easier for the Japanese to block these fighter reinforcements.
By the other side, the existence of such aerial support could give also, in
certain forms, a good security for the Bali, Badoeng and Lombok Straits. The
occupation of Bali was exclusively strategic and in spite of offering almost
nothing to the development of the Japanese Empire it was more than essential
it be captured.
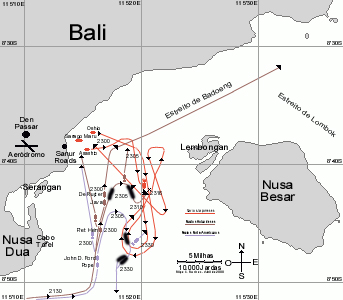
The Disembarkation at Sanur Roads and the disposition of the forces
In order to realise such a daring operation the Japanese moved to build up
a plan for the invasion of Bali, this being the first part of the final strike
operation against Java. On the 17th of February the Japanese already had concentrated
in Makassar a small naval force for this invasion and it consisted of two troop-transport
ships that would carry out the disembarkation, the Sasago Maru and the
Sagami Maru. The close escort of four destroyers, the Asashio, Oshio,
Arashio and Michishio, protected them. To support this force, if
necessary, there was the light-cruiser Nagara and his own three destroyers.
Hatsushimo, Nenohi and Wakaba would follow some distance behind,
staying in patrol stations in the north entrance of the Badoeng and Lombok Straits,
in the case of possible ship or submarine attacks from the ABDA forces. All
this force was co-ordinated on the bridge of the Nagara by the Japanese
Rear-Admiral Kyuji Kubo as it would have been strategically unsound to involve
the two joint naval forces in the small straits east of Bali; they would certainly
get more difficult to manoeuvre in the case of battle and they would offer more
targets to possible air and naval strikes of the Allies. During the travel that
the naval forces would make between Makassar to Bali they would be protected
by the air cover of A6M Zero fighters of the 3rd Air Group and from Tainon Air
Group, based in Makassar, to eliminate the chances of a successful Allied air
raid during the crossing of the Flores Sea.
The area chosen for the disembarkation at Bali was the small beaches near Sanur
Roads, in the southeast coast of the island and very near to Den Passar which
meant that the Japanese when disembarking should take the airfield as the main
objective. To proceed to the disembark and to the land advance in Bali were
detached some experienced forces from the Philippines part of which were the
48th Infantry Division, one regiment of the 1st Infantry Division of Formosa,
almost all the 3rd Battalion, one platoon of mountain artillery, one platoon
of engineering and some radio and logistic units. The Japanese were ready for
combat and their naval forces left Makassar on the night of the 17th to 18th
of February, heading for Bali.
The distance between Makassar and the disembarkation point was made without
incidents to the Japanese with only the sporadic presence of the allied reconnaissance
planes. The Japanese force arrived to the Badoeng Strait on the night of the
18th to 19th of February beginning the disembarkation in Sanur Roads from 0200
hours of the 19th of February onwards. The resistance offered by the 600 native
militiamen was little or none since they defected almost immediately. Meanwhile
to join the chaos, internal communication problems between the Dutch officers
and defenders lead them to not destroy the airfield, a task that should have
been carried out so that the airfield did not fall in the Japanese hands. This
meant they captured the airfield complex completely intact. At 1030 of 19th
of February the airfield was totally secured and the land advance through the
island proceeded, the goal was taken and the Japanese achieved one more magnificent
strategic victory.
 However, as I already
said before, the Japanese force was detected by the Allied air reconnaissance
and calculating their destination they soon they realised that Bali was to be
invaded. In certain forms anticipating an attack to this island, the ABDA forces
had already detached to patrol the Badoeng Strait the American submarine USS
Seawolf and to patrol the north entrance by the Flores Sea the British submarine
HMS Truant was on the way. Meanwhile the Japanese continued with the division
of their forces with the disembark force entering through the straits of the
island and the backup force remaining on patrol on the Flores Sea. Incredibly
the two Allied submarines were each one of them in the same zone of one of the
opposing Japanese forces. The first to make contact was Seawolf that
detected the main force already disembarking at 0200 of the 19th of February.
The American submarine tried to make a surface attack but it was spotted by
the Japanese destroyers and forced to dive. The navigation in the strait was
precarious because the submarine didn't know the area well and ran aground in
the bottom of the strait for some time. After some attempts and frustrations
the submarine came to surface but once again it was spotted by the Japanese
escorts that advanced to attack it. In the retreat of the zone at full speed
the Seawolf fired two torpedoes from the stern tubes but they missed
the targets and exploded against the coast of Bali. Meanwhile, at the same time
that Seawolf escaped, the Truant arrived to the north area of
Bali, where the support force of Kubo was. The British submarine managed to
get close enough to this force to fire six torpedoes against Nagara but
without any impact. Discovered and pursued by the Nagara escorts, the
Truant also retreated, to Soerabaja.
However, as I already
said before, the Japanese force was detected by the Allied air reconnaissance
and calculating their destination they soon they realised that Bali was to be
invaded. In certain forms anticipating an attack to this island, the ABDA forces
had already detached to patrol the Badoeng Strait the American submarine USS
Seawolf and to patrol the north entrance by the Flores Sea the British submarine
HMS Truant was on the way. Meanwhile the Japanese continued with the division
of their forces with the disembark force entering through the straits of the
island and the backup force remaining on patrol on the Flores Sea. Incredibly
the two Allied submarines were each one of them in the same zone of one of the
opposing Japanese forces. The first to make contact was Seawolf that
detected the main force already disembarking at 0200 of the 19th of February.
The American submarine tried to make a surface attack but it was spotted by
the Japanese destroyers and forced to dive. The navigation in the strait was
precarious because the submarine didn't know the area well and ran aground in
the bottom of the strait for some time. After some attempts and frustrations
the submarine came to surface but once again it was spotted by the Japanese
escorts that advanced to attack it. In the retreat of the zone at full speed
the Seawolf fired two torpedoes from the stern tubes but they missed
the targets and exploded against the coast of Bali. Meanwhile, at the same time
that Seawolf escaped, the Truant arrived to the north area of
Bali, where the support force of Kubo was. The British submarine managed to
get close enough to this force to fire six torpedoes against Nagara but
without any impact. Discovered and pursued by the Nagara escorts, the
Truant also retreated, to Soerabaja.
On the other side, knowing already of the presence of one Japanese force disembarking
in Bali, the ABDA forces grouped a small force of bombers of the USAAF composed
of thirteen B-17 high altitude bombers and by seven A-24 dive bombers, without
any escort of fighter planes (due to the absence of this kind of planes). The
force's take-off from the airfields at first light of the 19th and arrived at
Bali at 0700 of the same morning. Incredibly the Allied planes weren't attacked
by the Japanese beyond the weak opposition of their few anti-aircraft guns and
they proceeded to bomb the invasion force. The Allied planes completed their
mission and returned to their bases where they exaggeratedly announced that
they got four direct hits and twelve near-misses, also relating the presence
of heavy cruisers and other heavy tonnage warships supporting the disembarkation
that in reality weren't there. The reality was that they didn't get more than
one direct hit on the transport Sagami Maru engine room.
Apparently everything ran well for the Allies. It was supposed that the Seawolf
and the Truant managed to get some success and the bombers reports indicated
that many Japanese ships were damaged or even sunk. However, to get one such
necessary and complete Allied victory it was evident that they should send a
naval strike force to temporarily put an end to the Japanese menace around Java.
 As soon as the Japanese disembarking
in Bali was known, in the early morning of the 19th of February, the Allies
already had formed a plan and a naval force to attack the Japanese force. In
the lead of the Allied force was the Dutch Admiral Karl Doorman who in spite
of great difficulties and a short response time managed to group one small naval
force of three light-cruisers, eight destroyers and nine torpedo-launchers.
Nevertheless the force had to divide because of early naval operations preceding
this one, so Doorman had to move with his forces separately. In Tjilatjap was
formed the first strike force which used the Dutch light-cruisers De Ruyter
and Java, the Dutch destroyers Kortenaer and Piet Hein
and the American destroyers John D. Ford and Pope. The second
wave was made up of the Dutch light-cruiser Tromp, in Soerabaja, that
was waiting for the reinforcements of the American destroyers of Destroyer
Division 58, the Stewart, John D. Edwards, Parrott and Pillsbury,
that were coming from Ratai Bay, in the south of Sumatra. A third force of nine
torpedo-launches (TM-4, TM-5, TM-6, TM-7, TM-9, TM-10, TM-11, TM-12 and TM-13)
would leave from Soerabaja and assist the second wave in the final attack.
As soon as the Japanese disembarking
in Bali was known, in the early morning of the 19th of February, the Allies
already had formed a plan and a naval force to attack the Japanese force. In
the lead of the Allied force was the Dutch Admiral Karl Doorman who in spite
of great difficulties and a short response time managed to group one small naval
force of three light-cruisers, eight destroyers and nine torpedo-launchers.
Nevertheless the force had to divide because of early naval operations preceding
this one, so Doorman had to move with his forces separately. In Tjilatjap was
formed the first strike force which used the Dutch light-cruisers De Ruyter
and Java, the Dutch destroyers Kortenaer and Piet Hein
and the American destroyers John D. Ford and Pope. The second
wave was made up of the Dutch light-cruiser Tromp, in Soerabaja, that
was waiting for the reinforcements of the American destroyers of Destroyer
Division 58, the Stewart, John D. Edwards, Parrott and Pillsbury,
that were coming from Ratai Bay, in the south of Sumatra. A third force of nine
torpedo-launches (TM-4, TM-5, TM-6, TM-7, TM-9, TM-10, TM-11, TM-12 and TM-13)
would leave from Soerabaja and assist the second wave in the final attack.
Other ships could have joined with this force but for many reasons were unavailable
to this operation. The American destroyers Barker and Bulmer were
at Tjilatjap but they were damaged by the air raids of the 14th of February,
so they were going to be detached to Australia for repairs. The Dutch destroyers
Witte de with and Banckert were also in need of overhaul and damage
reparations and because of that they couldn't proceed to the attack. The Dutch
destroyer Evertsen and various British destroyers were escorting a troop
convoy through the Sunda Strait and were fighting at the same time the menace
of the Japanese submarines. Lastly, the American heavy-cruiser Houston
was also escorting a troop convoy from Darwin to Kupang, in the Dutch Timor,
and would take much time to arrive to Java.
The attack plan improvised by Doorman followed practically the same strategy
adopted by the American destroyers in the Battle of Balikpapan (24th of January
of 1942), that is; the Allied strike forces should be positioned between the
Japanese disembarkation lines. The initial attack was done by the artillery
of the light-cruisers, at point blank distance to inflict the maximum of damage
in a small space of time. After that the destroyers would follow with one torpedo
attack. Nevertheless, it was attributed to each one of the Allied forces one
specific function during the operation. The first force (light-cruisers De
Ruyter and Java, destroyers Kortenaer, Piet Hein, John D. Ford
and Pope would enter by the south of the Badoeng Strait and would attack
first with artillery and then with torpedoes, retreating after that to the north
of the strait. The second force (light-cruiser Tromp and destroyers Stewart,
John D. Edwards, Parrott and Pillsbury) would also enter by south
and should made a torpedo attack first with the Tromp giving artillery
support later. Finally, the third force of the nine Dutch torpedo-launches would
arrive shortly after that to attack the already damaged ships, with torpedoes.
The Allied force was far superior to the one that made the attack in Balikpapan
and all reports indicated that the submarine and air strikes had already damaged
the Japanese ships. The plan apparently was to be crowned with success and expected
to be an equal or even superior victory to the one for Balikpapan.
The first phase of the battle
Ready and lithely organised the first Allied strike force steamed from Tjilatjap
on the night of the 18th of February. But bad luck started to affect this naval
formation when it was leaving the harbour, the Dutch destroyer Kortenaer
lost rudder control for a time and ran aground in one of the channel shores.
It was impossible for the Dutch ship to return to the formation and they had
to wait for the next morning tide to free the ship, Doorman had to proceed with
the mission without this ship due to the time factor. Kortenaer had to
go to Soerabaja for the repair of such damage and wouldn't participate in this
action while the rest of the force steamed for Bali at 25 knots.
However, on those precise moments the Japanese disembarkation force had already
initiated their final mission and dealt at the same time with the Allied submarines
and bombers. Kubo was conscious of his vulnerable position and ordered to hurry
up the operation. Emergency repairs to the transport Sagami Maru were
made and at 2200 of the 19th of February the ship could sail and accompanied
by the Arashio and Michishio steamed for Makassar. The support
force leaded by the Nagara also reversed course and steamed for Makassar
too. In Sanur Roads only remained the transport Sasago Maru and the destroyers
Asashio and Oshio, which should collect the remaining Daihatsu
disembarkation launches, used in the attack of Bali.
While the Japanese made these movements, the first Allied force was arriving
in Bali. At 2130 of the 19th of February such force was sailing off Nusa Dua,
in the south extreme of Bali and was getting ready for combat. The battle formation
line was made with the De Ruyter and Java in the lead; followed
by the Piet Hein 5500 yards behind them and at the same distance from
the Dutch destroyer were the John D. Ford and the Pope. The speed
was raised to 27 knots and the Allied ships started to enter in the Badoeng
Strait. The sea was calm, the night was very dark and there was almost no wind,
the ideal scene for a night battle. At 2300, already inside the strait, Java
spotted the three Japanese ships at starboard (Sasago Maru, Asashio
and Oshio) that had already finished their mission and were preparing
themselves to leave to Makassar. Immediately the Java fired starshells,
to improve visibility, and then opened fire against Asashio at the point
blank range of 2200 yards. In the other side, De Ruyter with her artillery
pointed to portside took some time to open fire but as soon it was possible
made it against Oshio.
The Japanese destroyers were surprised but illuminated the area and with readiness
disposed themselves to protect their transport charging in an eastern course
against the Dutch cruisers. These last ones seeing that Asashio and Oshio
intended to cross their "T", changed course to the northeast with the objective
of clearing the area and to find other targets to the north, without success.
Although they didn't fire more then ten salvos, each one of the Dutch cruisers
claimed many impacts in the enemy destroyers (probably only a few near misses)
as the Japanese ships proceeded with their mission apparently without damage.
The Asashio managed to put one 5' projectile in Java but little
damage was done. The cruisers retreated at high speed and the Japanese destroyers
lost contact steaming now for southeast.
Meanwhile the Piet Hein also entered the scene and seeing that the Dutch
cruisers were engaging the Japanese destroyers, fired three torpedoes against
Sasago Maru opening fire with the 4.7' artillery against the same target.
However, free from the fire of the cruisers, the Asashio and Oshio
closed in to the Piet Hein firing against the Dutch ship. Faced with
this menace, at 2305 Piet Hein turned to starboard in a southeast course
launching two torpedoes against Asashio that would miss while simultaneously
firing the artillery and at the same time creating a smoke screen to camouflage
itself from the Japanese ships. At 2310 Asashio, at the close distance
of 1000 yards, hit it with two 5' shells, one in the second mast platform that
caused a great fire, and the other in the second boiler room. Immediately Piet
Hein was forced to stop due to the absence of propulsion and at same moment
was hit many times by the 25mm anti-aircraft guns of Asashio as it closed
in even more and launched torpedoes. Oshio also launched itself to this
unfair fight and fired torpedoes from its own side. Although heavily damaged,
Piet Hein managed to get some propulsion at 2316 but one of the Asashio's
torpedoes hit the ship at portside and it sunk almost immediately with great
loss of human life.
Piet Hein's destiny was sealed forever and again the unstopped Asashio
and Oshio advanced for the third time against the Allied ships. Piet
Hein's loss has raised in many studies, including the one I made, a few
questions related to the reasons that forced the ship to stop. Officially Asashio
hit the ship but it is also highly probable that the Dutch ship was an accidental
target of the American destroyers that followed it. Possibly the latter had
briefly lost contact with Piet Hein and suddenly sighted one unknown
destroyer steaming in the opposite direction while launching a smoke screen.
Obviously that they would have faced it as an enemy ship dissimulating the Japanese
transports and opened fire with their 4' guns against it, until they really
understood the true identification of the ship, probably too late. The fact
is that the causes of the damages and of the Piet Hein's sinking were
totally attributed to Asashio and any other possibilities were conveniently
forgotten.
However the battle continued for some time. At 2300 like the Piet Hein,
the John D. Ford and the Pope fired their portside torpedoes
against Sasago Maru, (they would also miss), following with the fire
of their 4' artillery, and shell hits were claimed in the transport. But at
2305 they watched one destroyer (Piet Hein) making smoke and "charging"
against them and that made them to closed in of it, raising the speed to 29
knots. When Piet Hein was hit, the American destroyers checking the real
identification of the ship rapidly steamed to assist it but they never would
arrive in time because it was sunk at 2316. The smoke screens made by the Dutch
destroyer hid Asashio and Oshio so they weren't detected by the
American destroyers that were closing in. When they passed through the Piet
Hein's smoke screen the American destroyers sighted Asashio, which
immediately opened fire at 2324 against John D. Ford. Although retaliating
with their artillery and with five torpedoes from Pope, without success,
the two Allied ships were forced to retreat to southeast making smoke simultaneously.
Attempts to set course to north were frustrated by the pressure of the Japanese
ships and by the torpedoes launched by them. Also Oshio entered the fight,
a fact that certainly forced the two American ships to abandon the area forever
to sail south, with the cover of another smoke screen, at 2330, without any
damage suffered or inflicted on the enemy. Asashio and Oshio lost
visual contact with the American ships and for a few minutes they exchanged
artillery salvos thinking each was attacking another Allied ship. Suffering
no damage, soon after that they would discover the error and join once again
to defend and assist the damaged Sasago Maru. Both Japanese destroyers
claimed the sinking of one Allied ship, improbable credit exception for the
Asashio that sunk Piet Hein. Meanwhile as soon he knew of the
sighting of Allied ships in the Badoeng Strait, Admiral Kubo ordered that Arashio
and Michishio leave the Sagami Maru to help the two other destroyers,
but they only arrived at the end of the second phase of the battle. By is own
side the Nagara force inverted again course and was steaming also to
join the same ships involved in the battle. At last, Asashio and Oshio
assisted Sasago Maru, probably damaged by the 4.7 shells of the Piet
Hein or by the 4' shells of the John D. Ford and Pope, they
reloaded their torpedo-tubes and were getting ready for the eventual second
Allied attack that it was on its way.
The attack of the second wave
To complete the mission of the first strike force, the second allied naval
formation sortied from the naval base of Soerabaja at the end of the afternoon
of the 19th of February, having estimated her arrival in the Badoeng Strait
in early morning of the 20th of February. Also this force was only able to leave
after the arriving and refuelling of the four American destroyers, coming from
the south of Sumatra. Contrary to the first force, bad luck didn't affect this
small formation and they carried on to the short travel between Soerabaja and
Bali without major problems. The force crossed the Bali Strait, surrounded the
south part of the island and at 0109 of the morning of the 20th of February
they were getting ready to enter in the Badoeng Strait. Then they proceeded
to battle line formation leaded by the Stewart, followed by the Parrott,
Pillsbury and by John D. Edwards, backwards was Tromp that
would support the charge of the destroyers with its 5.9' artillery. Speed was
raised to 28 knots. Radio silence was maintained and at the time news from the
first striking force was unknown, so, the second wave prepared to launch it
self into the Badoeng Strait not knowing the battle conditions.
However at 0130 the Allied ships were partially sighted by the Japanese ships
trying to identify the new intruders with light signals of Morse code. Unknowing
the position of the preceding strike force the Allied ships of the second wave
stained for moments confused about the intention of those signals. Ignoring
the chance of being friendly and trying to communicate with them, the Allied
force faced this challenge as being from the Japanese ships. So at 0136 the
Allied ships answered to the light signals, but with torpedoes. The Stewart
and the Parrott fired each one of their six portside torpedoes while
the Pillsbury fired only three. Incredibly all fifteen torpedoes missed
or were avoided by their targets. On the other side, Asashio and Oshio
seeing and avoiding the torpedoes wakes, couldn't get better confirmation that
in reality the unknown ships were enemies and once again they were going to
be attacked. Brief silent moments followed as the opposing forces were closing
against each other waiting for any moment to attack the enemy ships. Tension
raised when at 0143 Stewart spotted the two Japanese destroyers at portside.
Immediately it turned on and pointed their searchlights, firing with their 4'
guns against Oshio. Equally all the other three destroyers opened fire
and even John D. Edwards came to fire two torpedoes (that would miss),
however, other two were stuck in the tubes. Meanwhile, the Japanese answer was
quite immediate and with terrible efficiency, since Asashio's first salvo
straddled Stewart and the second one hit it with two 5' shells. At 0146
one shell from Asashio hit Stewart but slipped away and then another
shell penetrated the hull and hit the steering room, killing one sailor and
wounding one officer. The result was the damaged Stewart briefly lost
control and literally forced the other Allied destroyers to make evasive actions
to avoid collision.
Chaos was implanted in the Allied formation, by close that Parrott didn't
collide with the Stewart; Pillsbury was already steaming in one parallel
course to starboard as the battle begun. John D. Edwards had to violently
manoeuvre to starboard to avoid the Parrott, taking part again of the
formation short after that following the Stewart. Blocked from charging
against the disembark anchorage the Allied ships retreated to northeast with
the Asashio and the Oshio "tailing them". By that time the American
destroyers made another formation at 0200 as they retreated to northeast. Stewart
had recovered control and steamed now behind John D. Edwards, with the
Parrott steaming near the coast in a portside parallel course to them, Pillsbury
having moved away and steamed alone to starboard of the formation with the Tromp
following it 3000 yards behind. On their side Asashio and Oshio
had cut across the Allies course from behind and chased them starboardside,
trying to isolate and attack Pillsbury, unsuccessfully. At the same time
Tromp prepared itself to enter in the fight and raised the speed to 31
knots. Shortly after that the cruiser sighted at starboard Asashio and
Oshio trying to identify this strange ship by changing light signals.
Tromp answered by opening fire with their 5.9' guns against Oshio
and with their 40-mm anti-aircraft guns against Asashio. However
the ship committed the fatal mistake of turning on and pointing the searchlight
against the Japanese ships that now, knowing of Tromp's presence, had
one excellent aiming point for their artillery. So at 0207 one enormous "rain"
of 12 shells of 5' fired from Asashio hit them. One damaged the fire
control of the portside torpedo tubes, another destroyed the artillery director,
another nine hit the bridge and the surrounding area and one last one hit the
Dutch cruiser below the waterline, causing a brief flooding. At the same time
Oshio fired a spread of three torpedoes against the cruiser that managed
to avoid them closely, at 0216. With 10 dead and with 30 wounded, the damaged
cruiser continued to give fight to the Japanese destroyers, even to firing their
artillery manually and locally, successfully hitting both Oshio and Asashio.
At 0211 Oshio was hit between the bridge and in one of the portside torpedoes
magazine by one 5.9' shell but so close that there was no secondary explosions
that certainly would have sunk the ship. The result of the impact reflected
in 7 dead in Oshio's crew. Almost simultaneously many 40-mm shells hit
Asashio from Tromp that would destroy their searchlight platform
and cause 4 dead. Soon after that the Japanese ships and the Allied ships lost
contact mutually. Asashio and Oshio returned back to Sanur Roads
to assist and to protect the Sasago Maru. Tromp recovered from the fight
and returned for formation staying behind Pillsbury. Meanwhile Parrott
temporarily run aground at 0220 and manage to free itself but didn't participate
any more in the battle. John D. Edwards and Stewart steamed in
formation and like the other Allied ships were desperately running to northeast.
Nevertheless there was one surprise waiting for them and at 0247 Stewart
detected two ships steaming to southwest, in one opposite course of the
Allies. These were the Michishio and Arashio that left Sagami
Maru and came now in assistance to Asashio and Oshio. However
these two Japanese destroyers ignored the composition and the position of the
Allied force and accidentally put themselves exactly between the column of Pillsbury
and Tromp and the column of John D. Edwards and Stewart.
Immediately Stewart turned on and pointed the searchlight against Michishio
firing with their artillery and with the six starboard torpedoes, John
D. Edwards followed the example and equally fired their artillery and their
six starboard torpedoes. In the other side Pillsbury also fired their
remaining three portside torpedoes and teaming with Tromp fired against
the Japanese. The surprised Japanese destroyers could do little or nothing to
respond successfully against John D. Edwards and Stewart. To escape
the Stewart's searchlight, Michishio changed course to north but
suddenly it was hit by an enormous amount of shells. John D. Edwards hit
it and destroyed Michishio in the engine room while Pillsbury and
Tromp hit it in the anti-aircraft guns platform amidships and in the
bridge. Michishio was immediately immobilised and crippled with 13 dead
and 83 wounded aboard. Arashio seeing the disadvantage of their position
rapidly retreated to west staying undamaged in this brief fight.
Nevertheless, as had happened during the whole battle, all the torpedoes fired
by the Allies missed the targets, even at close range. Both opposite formations
weren't too much interested in returning to fight and rapidly search to retreat
each one of them for their own side. The allied force retired from the Badoeng
Strait and during the morning steamed along the north coast of Bali, where they
were attacked unsuccessfully by 9 Japanese bombers from Makassar and incredibly
were not found by the Nagara force, saving them another combat. They
would arrive at Soerabaja on the night of 20th of February without further problems.
Meanwhile, the Japanese force still remained for some time in the Badoeng Strait
and Asashio had to tow the damaged Michishio at the same time
that Arashio and Oshio continued to protect Sasago Maru,
on the way back to Makassar.
Relatively to the attack of the third wave, formed by the nine Dutch torpedo-launches,
such force sortied from Soerabaja in the morning of the 19th of February when
the second strike force was already on the way. However this formation initially
had some bad luck and when leaving the naval base of Soerabaja the TM-6
collided with one of the light buoys of the harbour and couldn't proceed to
the mission because of the suffered damage. The remaining eight launches steamed
to the Badoeng Strait, by the Bali Strait, as had the second wave. A stop in
Pangpang Bay to be refuelled by one Dutch auxiliary ship was required and then
they steamed very quickly to the Badoeng Strait to arrive shortly after the
second force had retreated. They positioned themselves near Lemblogan Island
to review the combat formation. Split in two groups of four, the Dutch torpedo-launches
advanced to the centre of the Badoeng Strait and to Sanur Roads. The first group
approached off the coast and to the anchorage but detected no Japanese ships.
However the second group, steaming almost at 8000 yards of it, detected one
Japanese destroyer (probably Oshio or Arashio) heading south at
high speed. Even with raising the speed to 30 knots the torpedo-launches of
the second group never reached a favourable attack position. Frustrated in their
attack the two groups rejoined again and steamed back to Soerabaja by the same
course, being again refuelled at Pangpang bay. The naval battle of the Badoeng
Strait was finally over.
Conclusion
In the first place, the battle of the Badoeng Strait should never have happened,
not in the way that was made and not with the conditions in which it was realised.
Doorman's plan completely changed when the battle took place. The Allies achieved
everything but the wanted surprise factor, when opening fire the Dutch light-cruisers
renounced the possibility of one eminent surface attack. Also the Dutch gunners
failed completely to damage or sink the only ships that could offer them some
resistance, Asashio and Oshio. The Japanese ships were without
doubt surprised by the attack of the cruisers but their great training capabilities
in night combats enabled them to respond to the attack. Apart from the Java
being hit by one 5' shell, the Dutch light-cruisers had many lucky moments
in this initial phase of the battle, their quick retreat was well pondered and
avoided further damage, and saved them from becoming victims of a torpedo attack.
On the other hand, Piet Hein was completely inevitable. The Dutch destroyer
should never have become isolated in the battle. The Japanese had inferior numbers
during the battle but in that small moment Asashio and Oshio come
across with Piet Hein they achieved a small superiority and from there
they took great benefit when attacking and sinking the Dutch ship. Piet Hein
should have entered in the fight accompanying the Dutch light-cruisers or
the American destroyers. Following these way results probably would be different.
After that, the procedure of the John D. Ford and of the Pope
may be considered correct, in spite of having no success, they launched torpedoes
first, then attacked with their artillery and when coming across the furious
combat tenacity of the Japanese destroyers opted well to retreat to south. This
decision was criticised by many but if the two American ships really had proceeded
to north they certainly would have been positioned between the two Japanese
ships and doubtfully that they would be submitted to cross fire and to torpedo
spreads. Probably, their destiny would be the same of the Piet Hein.
The attack of the second wave was percentage wise much more successful. The
initial attack with torpedoes was decisive but all the torpedoes (Mk8) were
avoided or failed to explode against their targets. Certainly if their warheads
had detonated against the three Japanese ships the battle would have ended in
that moment. However such didn't happen and Asashio and Oshio
faced again a far superior Allied force. The Stewart suffered damage
that could have happened to any ship present in the battle, even to the Japanese,
simply the gunners of the latter were more accurate. The damage that the Tromp
susustained was inexcusable. The Japanese didn't know of the presence of this
ship until the moment that it turned on the searchlight. With much luck none
of the hits of the shell rainstorm that the Tromp received affected the
propulsion equipment of the ship and for close the Dutch light-cruiser wasn't
victim of a torpedo spread that certainly would have sunk the ship. On the other
side, the Japanese gunfire had damaged Tromp's bridge, gun director and
starboardside torpedo tubes reducing significantly the cruisers combat capacity.
Had the Tromp hit Oshio with one 5.9' shell using local and manual
gun direction imagine what would have happened to the Japanese destroyer if
the gun director of the Dutch light-cruiser was still operational, probably
it would be reduced to a flaming hull.
The sudden appearance of Arashio and of Michishio was a total
surprise to the Allied ships that were retreating to northeast, but the fact
of the new Japanese reinforcements unknown the position and the composition
of the enemy force accidentally lead them to positioning between the two Allied
columns. Taking immediately advantage of the favourable position the Allied
ships opened fire against them achieving their major success in all the battle
when putting the Michishio out of action. They didn't succeed more because
they retreated rapidly off the scene.
The employment of the torpedo-launches squadron era doubtfully the best way
to finish off this battle. It was supposed that the Japanese transports (in
the case only Sasago Maru) would be defenceless and they would be easy
targets for the torpedoes from the launches. However, the limited vision range
of this kind of ships and the dark night of the battle in which they were involved
lead the third group to badly establish contact and forced to retreat in face
of such unknown conditions. In fact the launches almost didn't entered in the
Badoeng Strait and if they really have done it they could inflicted some more
damage to the Japanese ships, equilibrating more the situation, at least in
material terms. Certainly that they would present an excessive number of targets
to the Japanese destroyers and in the middle of the chaos it was much probable
that one or more torpedoes from the launches would finish to hit one Japanese
ship.
The naval battle of the Badoeng Strait was with no doubt one defeat to the
Allied forces, both in strategic, material or tactic levels. In strategic terms
the island of Bali was conquered forever by the Japanese and the various Allied
attacks failed to stop the disembarkation at Sanur Roads. On the other hand
Doorman's forces never arrived at time to avoid it, if there had been an early
Allied reaction maybe it was possible to disable the Japanese attack. So the
Japanese aerial groups find one newly base and after that they could practically
intercept all the allied reinforcements from Australia. The island of Java was
literally all surrounded and at the same time condemned herself to her own occupation
by the Japanese invader.
In material terms the Allies also paid one heavy defeat. They had lost one
destroyer (Piet Hein) and had another one seriously damaged (Stewart)
that would come to suffer the humiliation to serve under the flag of the Empire
of the Rising Sun. The ship was captured when it was in dry-dock, at Soerabaja,
when the final attack was being made to the island. The Java suffered
only minor damage but Tromp was so damaged that it was immediately despatched
to Australia for repairs. On the Japanese side the biggest casualty was the
Michishio that was crippled, the Oshio suffered moderate damage and
Asashio and Sasago Maru get only light damage. Besides the exception
of the Michishio all the other Japanese ships could return rapidly to
service. The literal loss of two destroyers and one light-cruiser in the Allies
side would certainly bring to them serious consequences in the next battle.
Much probably that if this ships and many others that were already lost during
the Java campaign were present in the final battle of the Java Sea the results
would be more equilibrated in material terms, since defeat was practically already
admitted from the very beginning of the campaign.
Respectively to the tactic field, the Allied combat strategy adopted was totally
inverted in favour to the tenacity of the two Japanese destroyers. Not even
the numeric superiority would give them something. In the other side it was
much probable that Doorman excessively trusted in artillery and ignored the
effects of the torpedoes. Without doubt that the Java Campaign was marked to
the Allies by the awful working and employment of torpedoes, but the use of
artillery means the loss of the surprise factor. Another important fact to refer
was the training and the performance of the crews of the ships. The Japanese
were highly qualified in night fighting and were strongly moralised to fight
because of the constant number of anterior victories. Nevertheless the allies
didn't equalised themselves to the Japanese in night fighting and their crews
were excessively saturated by the early naval operations and by the fact that
they were constantly in battlestations because of airstrikes. Everything failed
to the Allies in this operation, it was more favourable that they never had
to choose to fight, at least they would have spared the ships and the crews
to the final battle.
BASIC RECOMMENDABLE BIBLIOGRAPHY:
DULL, Paul S., "A Battle History of the Imperial Japanese Navy (1941-1945)",
Annapolis, United States Naval Institute Press, 1978.
ROSCOE, Theodore, "United States Destroyer Operations in World War Two",
Annapolis, United States Naval Institute Press, 1953
VAN DER VAT, Dan, "The Pacific campaign: World War Two: The U.S.-Japanese
Naval War, 1941-1945", Touchstone Press, 1992
VAN OOSTEN, F. C., "The Battle of the Java Sea", Annapolis, United States
Naval Institute Press, 1976
WILLMOTT, H. P., "Empire in Balance: Japanese and Allied Pacific Strategies
to April 1942", Annapolis United States Naval Institute Press, 1982
WINSLOW, W. G., "The Fleet the Gods forgot - The U.S. Asiatic Fleet in World
War Two", Annapolis, United States Naval Institute Press, 1994