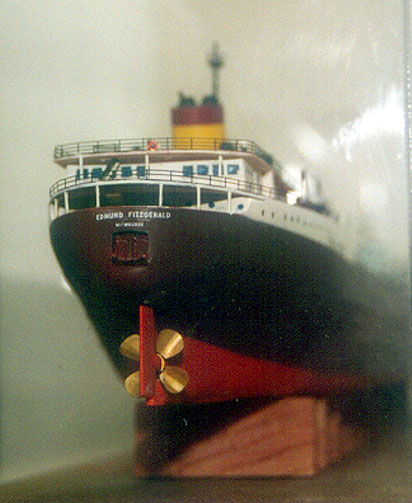
Edmund Fitzgerald
Iron Shipwright - 1/350
By: Michael Taylor
 Iron
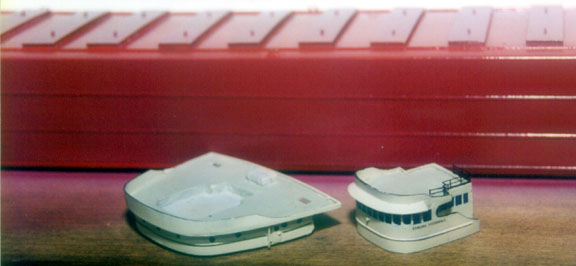
Shipwright's kit consists of 5 main resin pieces. The hull, Forward deck level,
bridge level, aft deck level and stack. Various other resin pieces include ships
boats, winches, pieces for the hatch lift, rudder, prop and so on. 2 sheets
of photo etched parts are supplied, these including railing, lights, antennae,
and various other parts.
Iron
Shipwright's kit consists of 5 main resin pieces. The hull, Forward deck level,
bridge level, aft deck level and stack. Various other resin pieces include ships
boats, winches, pieces for the hatch lift, rudder, prop and so on. 2 sheets
of photo etched parts are supplied, these including railing, lights, antennae,
and various other parts.
The first thing I noticed was that the hull's bottom is flat. This brought
a smile to my face as  I
realized this makes clean up of the casting plug (virtually nonexistent anyway)
much easier. I also noticed that this is a chunky bit O' resin (gets those:
OOOooooohhh RESIN, genes in an uproar). The second thing I noticed was the bag containing
the deck levels. Nicely molded , the bullworks are paper thin. Unfortunately
when you package parts with paper thin walls in 1 bag they tend to bang into
each other during shipping. I had received 2 sets and both had damage. I suggested
that in the future each level be packages separately and bubble wrapped. I've
often wondered, having seen many splintershields for expensive 1/350 BB's damaged,
why they ( various resin manufacturers) don't offer these parts as photo etch?
So I chose the least damaged parts and was able to repair them with some time,
patience, milliput, and superglue. Continuing my inspection I looked at the
smaller bits. Everything looked fine except both props were marred with holes
in the "shafts" and looked a bit thick. Moving on to the instructions I was
again wary of the content of I.S's sheets, a concern that was later justified.
To supplement the instructions I used the photos of Fine Art Models offering
and my copy of the Discovery channels Disasters at Sea episode on the Big Fitz.
I
realized this makes clean up of the casting plug (virtually nonexistent anyway)
much easier. I also noticed that this is a chunky bit O' resin (gets those:
OOOooooohhh RESIN, genes in an uproar). The second thing I noticed was the bag containing
the deck levels. Nicely molded , the bullworks are paper thin. Unfortunately
when you package parts with paper thin walls in 1 bag they tend to bang into
each other during shipping. I had received 2 sets and both had damage. I suggested
that in the future each level be packages separately and bubble wrapped. I've
often wondered, having seen many splintershields for expensive 1/350 BB's damaged,
why they ( various resin manufacturers) don't offer these parts as photo etch?
So I chose the least damaged parts and was able to repair them with some time,
patience, milliput, and superglue. Continuing my inspection I looked at the
smaller bits. Everything looked fine except both props were marred with holes
in the "shafts" and looked a bit thick. Moving on to the instructions I was
again wary of the content of I.S's sheets, a concern that was later justified.
To supplement the instructions I used the photos of Fine Art Models offering
and my copy of the Discovery channels Disasters at Sea episode on the Big Fitz.
 As
always I began by cleaning up the hull bottom and measuring for mounting screws.
After drilling the holes I mounted the hull on a "work board" because I like
to handle it as little as possible. I then gave the hull a good looking over
to see if there were any major flaws, decided there weren't and primed
it with Floquil primer. Colors called for are red below the waterline, maroon
above with cream upper works and a red main deck with maroon hatch covers. I
used Testors colors. Italian red, burnt umber with some red added, and white
with some ivory added, following the aforementioned listing. I sprayed the Italian
red lower hull and allowed it to dry. Next I used masking tape to separate this
from the maroon, but first I stuck it to my hand a few times to allow the oils
to lessen the tapes tack.
As
always I began by cleaning up the hull bottom and measuring for mounting screws.
After drilling the holes I mounted the hull on a "work board" because I like
to handle it as little as possible. I then gave the hull a good looking over
to see if there were any major flaws, decided there weren't and primed
it with Floquil primer. Colors called for are red below the waterline, maroon
above with cream upper works and a red main deck with maroon hatch covers. I
used Testors colors. Italian red, burnt umber with some red added, and white
with some ivory added, following the aforementioned listing. I sprayed the Italian
red lower hull and allowed it to dry. Next I used masking tape to separate this
from the maroon, but first I stuck it to my hand a few times to allow the oils
to lessen the tapes tack.  This
prevents the tape from pulling the paint off the resin, continuing in the same
manner for the cream which I mixed to just this side of white.. The main deck
was painted insignia red then the entire hull was given a good coat of Future
floor wax to act as a barrier. The deck of the forward "01" level was then painted
light gray and the after "01" level deck was painted insignia red. The interiors
of the bullworks were touched up in cream and the tops were painted black then
the hatch covers were painted the maroon mix and everything was once again given
a gloss of Future.
This
prevents the tape from pulling the paint off the resin, continuing in the same
manner for the cream which I mixed to just this side of white.. The main deck
was painted insignia red then the entire hull was given a good coat of Future
floor wax to act as a barrier. The deck of the forward "01" level was then painted
light gray and the after "01" level deck was painted insignia red. The interiors
of the bullworks were touched up in cream and the tops were painted black then
the hatch covers were painted the maroon mix and everything was once again given
a gloss of Future.
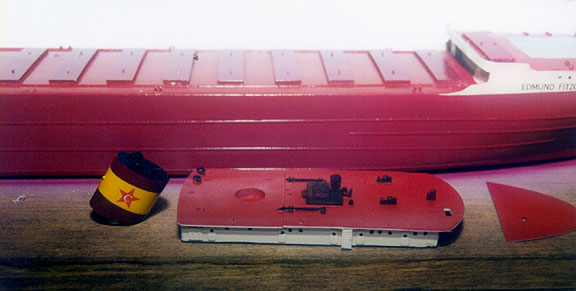
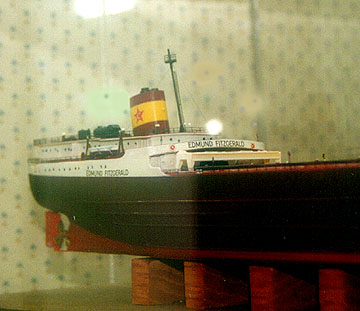
The stack was painted in the maroon mix but instead of using the supplied decal
for the 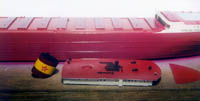 yellow
stripe I decided to mask and paint it with insignia yellow. The forward bridge
2 & 3 levels were painted cream, left to dry then given a coat of Future.
After this had dried the decks were brush painted Floquil primer gray and the
windows were filled in with dark blue. The upper aft level was treated the same
way with the exception that the deck was painted insignia red. Fit of the different
levels was tricky, with a plug on the bottom of the uppers that's to fit into
a space in the lower. Unfortunately the fit of these was poor requiring a good
amount of sanding to get them to sit down. Complicating this is the fact that
the decks are crowned ( higher in the center).
yellow
stripe I decided to mask and paint it with insignia yellow. The forward bridge
2 & 3 levels were painted cream, left to dry then given a coat of Future.
After this had dried the decks were brush painted Floquil primer gray and the
windows were filled in with dark blue. The upper aft level was treated the same
way with the exception that the deck was painted insignia red. Fit of the different
levels was tricky, with a plug on the bottom of the uppers that's to fit into
a space in the lower. Unfortunately the fit of these was poor requiring a good
amount of sanding to get them to sit down. Complicating this is the fact that
the decks are crowned ( higher in the center).
 With
the various deck levels painted and ready to mount I began attaching the railing.
By this time the base had arrived and the hull was permanently mounted on blocks.
I always begin railing starting at the lowest level and working up. In this
case that means the main deck. In order to get the proper fit to the fore and
aft bulkheads I used a piece of printer paper held against the hull and rubbed
a pencil on it to get the correct contour. Then the forward ( or rear ) of the
photo etched railing was cut to this contour then glued in place. Three runs
of railing were needed per side. Also at this level are deck lights ( like street
lights) that run along both sides every 2 hatch covers. I don't believe that
there were enough on one fret to complete it to my liking but seeing as I had
a spare set I was able to add 2 more per side. Railings were then measured,
cut and added to the upper levels and railings were also added around the stairwells.
With the railing added the deck levels were set in place using 2 part epoxy
and the ship was set aside to cure.
With
the various deck levels painted and ready to mount I began attaching the railing.
By this time the base had arrived and the hull was permanently mounted on blocks.
I always begin railing starting at the lowest level and working up. In this
case that means the main deck. In order to get the proper fit to the fore and
aft bulkheads I used a piece of printer paper held against the hull and rubbed
a pencil on it to get the correct contour. Then the forward ( or rear ) of the
photo etched railing was cut to this contour then glued in place. Three runs
of railing were needed per side. Also at this level are deck lights ( like street
lights) that run along both sides every 2 hatch covers. I don't believe that
there were enough on one fret to complete it to my liking but seeing as I had
a spare set I was able to add 2 more per side. Railings were then measured,
cut and added to the upper levels and railings were also added around the stairwells.
With the railing added the deck levels were set in place using 2 part epoxy
and the ship was set aside to cure.
 With
the ship basically finished all that was left to do
With
the ship basically finished all that was left to do 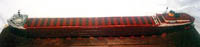 was
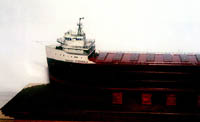
to place the smaller parts (winches, vents, stack) the rudder and prop,
masts, and the ships boats. All winches and vents were placed according to the
instructions , the lifeboat davits were painted maroon and glued into position.
The lifeboats were painted cream with maroon bottoms and light gray covers then
glued into place. Positioning the photo-etched pulley's completed the assembly.
The hatch cover-lifting crane was next. Assembled from 4 resin and 8 photo etched
parts I found it to be a simple assembly and when it was finished and the glue
dried
was
to place the smaller parts (winches, vents, stack) the rudder and prop,
masts, and the ships boats. All winches and vents were placed according to the
instructions , the lifeboat davits were painted maroon and glued into position.
The lifeboats were painted cream with maroon bottoms and light gray covers then
glued into place. Positioning the photo-etched pulley's completed the assembly.
The hatch cover-lifting crane was next. Assembled from 4 resin and 8 photo etched
parts I found it to be a simple assembly and when it was finished and the glue
dried it was painted cream and glued into place above the rearmost hatch. Both propellers
I had were marred with voids in the shafts so I replaced it with rod stock
and a 4 bladed prop from Flagship Models. The masts were constructed from brass
rod using both the instructions and the photos of Fine Art Models E-Fitz as
a guide. The decals are well printed but on the yellow stack stripe a fine mesh
design is barley discernible. I also made the mistake of touching a decal with
a q-tip dipped in thinner while I was touching up some paint and the decal came
off also, no problem as the guys at Commanders sent me another sheet to replace
my mistake. The depth markings are only given in black so I used some from MB/Blue
Water Navy'' sheet to replace them in white. One final overall coat of Future
to blend everything together and when dry it was ready for a final coat of Testors
Dullcoat Laquer. One last check for dust and the case was placed over it and
fastened with a brass pin in either end.
it was painted cream and glued into place above the rearmost hatch. Both propellers
I had were marred with voids in the shafts so I replaced it with rod stock
and a 4 bladed prop from Flagship Models. The masts were constructed from brass
rod using both the instructions and the photos of Fine Art Models E-Fitz as
a guide. The decals are well printed but on the yellow stack stripe a fine mesh
design is barley discernible. I also made the mistake of touching a decal with
a q-tip dipped in thinner while I was touching up some paint and the decal came
off also, no problem as the guys at Commanders sent me another sheet to replace
my mistake. The depth markings are only given in black so I used some from MB/Blue
Water Navy'' sheet to replace them in white. One final overall coat of Future
to blend everything together and when dry it was ready for a final coat of Testors
Dullcoat Laquer. One last check for dust and the case was placed over it and
fastened with a brass pin in either end.
 Iron
Shipwright's E-Fitz is certainly a change of pace from warships. It's engineering
makes assembly simple yet it's poorinstructions and lack of complete photo etch
parts labeling may lead the builder to scratch their head from time to time.
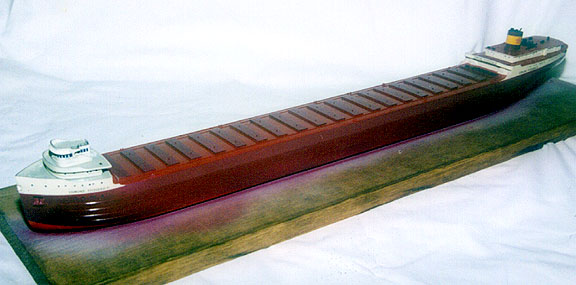
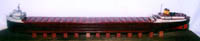
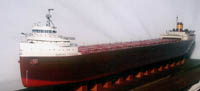
Measuring out at an impressive 26" it is a fine replica of a legendary ship.
Builders with little resin and photo etch experience should be able to do a
fine job on this kit, just be forewarned, additional references besides the
instructions will be helpful in it's construction.
Iron
Shipwright's E-Fitz is certainly a change of pace from warships. It's engineering
makes assembly simple yet it's poorinstructions and lack of complete photo etch
parts labeling may lead the builder to scratch their head from time to time.
Measuring out at an impressive 26" it is a fine replica of a legendary ship.
Builders with little resin and photo etch experience should be able to do a
fine job on this kit, just be forewarned, additional references besides the
instructions will be helpful in it's construction.
 Iron
Shipwright's kit consists of 5 main resin pieces. The hull, Forward deck level,
bridge level, aft deck level and stack. Various other resin pieces include ships
boats, winches, pieces for the hatch lift, rudder, prop and so on. 2 sheets
of photo etched parts are supplied, these including railing, lights, antennae,
and various other parts.
Iron
Shipwright's kit consists of 5 main resin pieces. The hull, Forward deck level,
bridge level, aft deck level and stack. Various other resin pieces include ships
boats, winches, pieces for the hatch lift, rudder, prop and so on. 2 sheets
of photo etched parts are supplied, these including railing, lights, antennae,
and various other parts.