 During
one of my frequent box opening and subsequent fondling of kit contents, something
wondrous happened I built one !!!!!!! Ever since receiving this cute little
ship a few months back I have played with the parts, cleaned them up and then
put it back in the pile. However this time I found myself affixing rails and
painting ... but I am getting ahead of myself.
During
one of my frequent box opening and subsequent fondling of kit contents, something
wondrous happened I built one !!!!!!! Ever since receiving this cute little
ship a few months back I have played with the parts, cleaned them up and then
put it back in the pile. However this time I found myself affixing rails and
painting ... but I am getting ahead of myself.
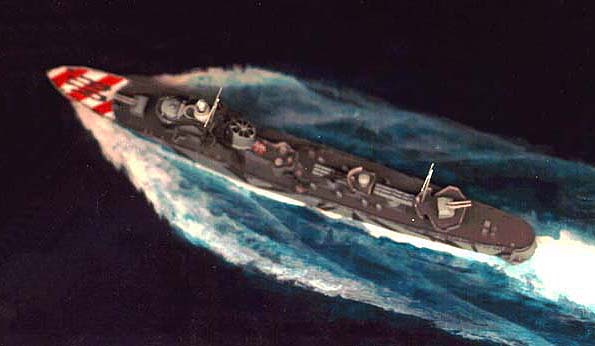
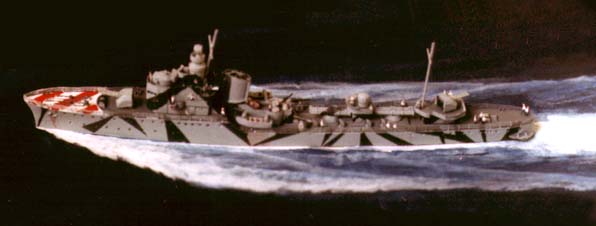
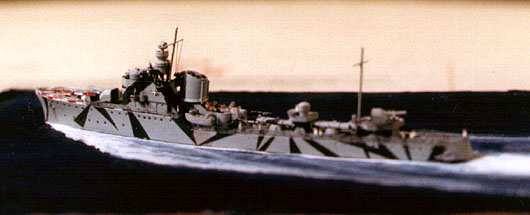
The Freccia was lead ship of a class of Italian destroyers, none of which
survived the Second World War. Sadly I know little more then the bare outline
of their (or other Italian destroyers) history and would welcome an English
language publication that would dwell on their service.
As mentioned in my review
of this kit, the resin is very nice to work with and was nicely cast. Minor
cleanup on all parts took place during the frequent fondling over the last
two months. Later all my pending models were washed in dish detergent to remove
the mold release agent and other oils etc. from the parts. With any kit this
is an important step, but even more so with resin as it does seem to be temperamental
in the application of paint otherwise.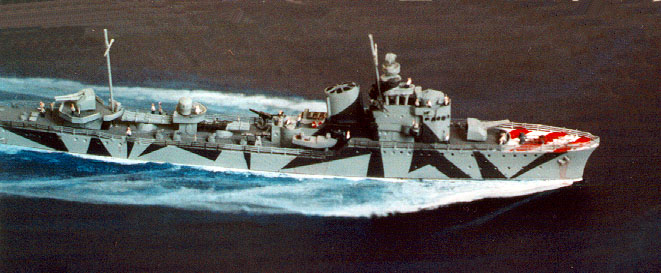
Construction began by CAing on an 'L' shaped section of sprue to act as a
hand hold and to eliminate the need to touch the hull itself unless absolutely
necessary. In addition to this I have cut a 1/4" x 4" slot into a piece of
4x8 card and the hull is then placed on the card with the sprue extending
below it, anchoring it to the card. The model can now be handled by holding
the sprue or the edge of the card. I have also cut a slot into a box and the
entire component may be placed there when not in use.
 I
decided this would be an almost strictly Out-Of-Box experience with the only
non-kit supplied additions being PE rails and crew. The railings used were
Eduard's German 3-bar set. Up to this point all of my PE rails have been done
using Eduard rails, these feature separate stanchions rather than a continuous
solid foot as in other brands. Since completing the Freccia I have tried the
other style and found that whereas the Eduard rails took almost an hour per
section, I could do a side in about 5 minutes with the solid foot. Both types
have advantages, but for ease of use I would have to recommend solid bottoms.
To remove the PE from the fret I work at my light table (made by routing a
section from one of the dining room table leaves) and use my trusty No.10
blade (I think that is the one. . big, curved blade for carving..), a firm
bit of pressure is followed by a satisfying
I
decided this would be an almost strictly Out-Of-Box experience with the only
non-kit supplied additions being PE rails and crew. The railings used were
Eduard's German 3-bar set. Up to this point all of my PE rails have been done
using Eduard rails, these feature separate stanchions rather than a continuous
solid foot as in other brands. Since completing the Freccia I have tried the
other style and found that whereas the Eduard rails took almost an hour per
section, I could do a side in about 5 minutes with the solid foot. Both types
have advantages, but for ease of use I would have to recommend solid bottoms.
To remove the PE from the fret I work at my light table (made by routing a
section from one of the dining room table leaves) and use my trusty No.10
blade (I think that is the one. . big, curved blade for carving..), a firm
bit of pressure is followed by a satisfying  have
heard from others I now do my construction out of sequence to most. From various
threads on the Ship Modelling Mailing List it seems most folks paint the hull
then attach rails . . . I can't bring myself to try it in that order yet.
However this may be because of the mess I make using the Eduard rails with
separate stanchions, perhaps the others go easier on painted surfaces . .
I will have to try that order soon (the current project in fact).
have
heard from others I now do my construction out of sequence to most. From various
threads on the Ship Modelling Mailing List it seems most folks paint the hull
then attach rails . . . I can't bring myself to try it in that order yet.
However this may be because of the mess I make using the Eduard rails with
separate stanchions, perhaps the others go easier on painted surfaces . .
I will have to try that order soon (the current project in fact).
The PE rails are affixed to the hull using CA starting at the fo'c'sle break.
I try putting a dab of CA on the first few stanchions and then place it in
location on the hull. If this works, tweezers are then used to pull the rail
straight and another section is affixed about an inch away. If it didn't work
after a few tries, than a small amount of CA is placed on the hull and the
rail is held in place while it dries. Eventually the rails were complete and
it was time to paint.
 Depending
on your preferences, resin kits either take the fun away from building, or
get you to the fun part sooner. Myself I enjoy the building most of all and
it seems to me that the fun is done and just the painting and final assembly
are left. I began by attaching all parts to sections of sprue to allow myself
to hold even the smallest pieces while airbrushing them. The first colour
used was Tamiya acrylic dark grey for the decks. This was alsosprayed on all
other surfaces as a primer, and then set aside to dry for a day. According
to an article on the Capitani Romani Class Light Cruisers in WARSHIP Vol.2,
Italian ships carried light and dark grey camouflage separated by either curved
or straight, angular shapes. Both greys were also supposed to be slightly
blue tinged. The light grey was made by adding a few drops of Ceramcoat Artist's
Acrylic Prussian blue to Quaker Grey and then thinning this with water. Ceramcoat
also works wonders when used to tint other brands acrylic paints, the only
drawback is it has a fairly heavy grain and it takes awhile to get a good
balance of compressor pressure, tip and needle used etc. Unfortunately I still
don't have it to a science. The first three ships I used it on went great,
the next couple were so-so and then the Freccia worked . . . go figure. The
darker grey was a dark grey with black and Prussian blue added. All vertical
surfaces were sprayed from just below the level of the maindeck to allow the
hull itself to mask the deck from overspray. A fine brush was then used for
touchups right down to the deck.
Depending
on your preferences, resin kits either take the fun away from building, or
get you to the fun part sooner. Myself I enjoy the building most of all and
it seems to me that the fun is done and just the painting and final assembly
are left. I began by attaching all parts to sections of sprue to allow myself
to hold even the smallest pieces while airbrushing them. The first colour
used was Tamiya acrylic dark grey for the decks. This was alsosprayed on all
other surfaces as a primer, and then set aside to dry for a day. According
to an article on the Capitani Romani Class Light Cruisers in WARSHIP Vol.2,
Italian ships carried light and dark grey camouflage separated by either curved
or straight, angular shapes. Both greys were also supposed to be slightly
blue tinged. The light grey was made by adding a few drops of Ceramcoat Artist's
Acrylic Prussian blue to Quaker Grey and then thinning this with water. Ceramcoat
also works wonders when used to tint other brands acrylic paints, the only
drawback is it has a fairly heavy grain and it takes awhile to get a good
balance of compressor pressure, tip and needle used etc. Unfortunately I still
don't have it to a science. The first three ships I used it on went great,
the next couple were so-so and then the Freccia worked . . . go figure. The
darker grey was a dark grey with black and Prussian blue added. All vertical
surfaces were sprayed from just below the level of the maindeck to allow the
hull itself to mask the deck from overspray. A fine brush was then used for
touchups right down to the deck.
 One
more day then went by before the camouflage pattern was begun. I was unable
to find any photos of Freccia herself so I made up a spurious pattern roughly
based on that of the Romani Class ship Attilio Regolo. Frosted scotch tape
was tacked down to the light table and the pattern was drawn on it. Using
a metal erasing shield and a new No.11 blade, each section was cut out and
affixed to the hull. The dark grey was then mixed . . a deep breath taken
and the compressor was turned on. Once again spraying from below yielded a
nice edge to all parts. The tape was now removed and . .. DISASTER!!!!!!!
some of the paint came up on the port bow (remember what I said about no oils
. . .). After numerous touchups with the brush this is now barely noticeable,
but it was a good lesson to myself to be more careful in the future.
One
more day then went by before the camouflage pattern was begun. I was unable
to find any photos of Freccia herself so I made up a spurious pattern roughly
based on that of the Romani Class ship Attilio Regolo. Frosted scotch tape
was tacked down to the light table and the pattern was drawn on it. Using
a metal erasing shield and a new No.11 blade, each section was cut out and
affixed to the hull. The dark grey was then mixed . . a deep breath taken
and the compressor was turned on. Once again spraying from below yielded a
nice edge to all parts. The tape was now removed and . .. DISASTER!!!!!!!
some of the paint came up on the port bow (remember what I said about no oils
. . .). After numerous touchups with the brush this is now barely noticeable,
but it was a good lesson to myself to be more careful in the future.
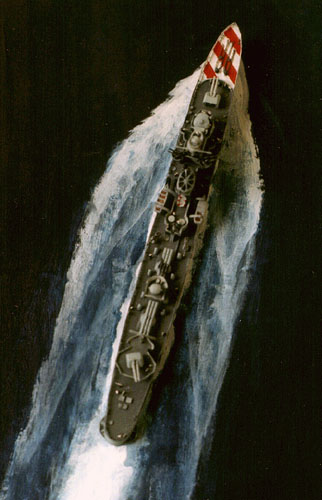
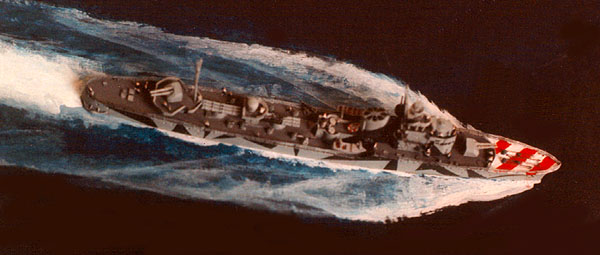
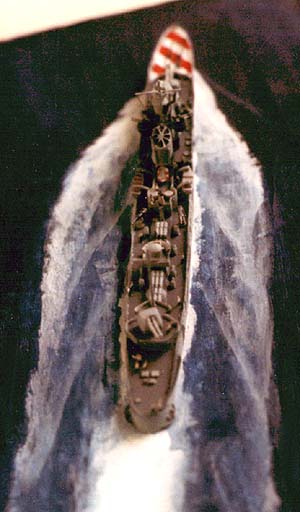 The
most noticeable feature of Italian warships while a member of the Axis powers
was the red/white air recognition stripes carried on the bow. To paint these
I once again used Ceramcoat paints and a fine brush. My first attempt was
interrupted by a four-year old deciding to climb upon my back to watch what
I was doing . . . later she was content to just stand beside me on a box while
I fixed it. The Freccia also carried the letters 'FR' on the side of the hull
in red, however I haven't found suitable decals to replicate this feature,
hence they are still lacking.
The
most noticeable feature of Italian warships while a member of the Axis powers
was the red/white air recognition stripes carried on the bow. To paint these
I once again used Ceramcoat paints and a fine brush. My first attempt was
interrupted by a four-year old deciding to climb upon my back to watch what
I was doing . . . later she was content to just stand beside me on a box while
I fixed it. The Freccia also carried the letters 'FR' on the side of the hull
in red, however I haven't found suitable decals to replicate this feature,
hence they are still lacking.
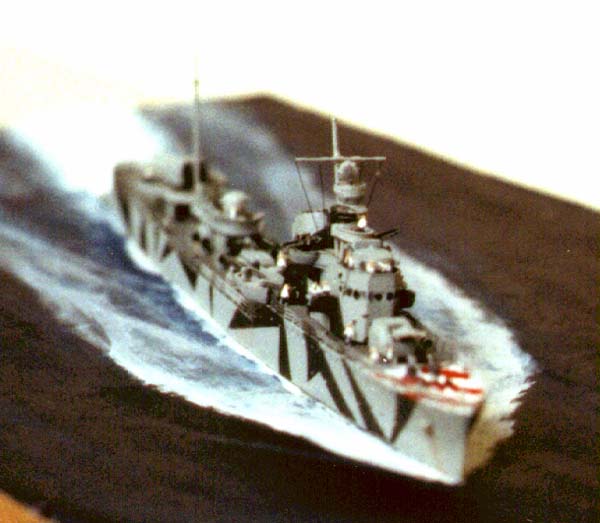 One
nice touch that Waveline provide is your choice of round-front or flat-angular
front bridge. I chose the flat faceted one. All of the superstructure components
were painted at the same time as the hull, so all that was left was to assemble
them. This went straightforward as far as the superstructure goes until I
reached the director platform at the rear of the bridge. This is a platform
on top of six vertical pillars, however Waveline give you a solid structure
with the structure in relief, so you must either paint the interior a dark
colour, or remove the legs and build your own. I chose the latter and cut
away the supports and used sprue instead.
One
nice touch that Waveline provide is your choice of round-front or flat-angular
front bridge. I chose the flat faceted one. All of the superstructure components
were painted at the same time as the hull, so all that was left was to assemble
them. This went straightforward as far as the superstructure goes until I
reached the director platform at the rear of the bridge. This is a platform
on top of six vertical pillars, however Waveline give you a solid structure
with the structure in relief, so you must either paint the interior a dark
colour, or remove the legs and build your own. I chose the latter and cut
away the supports and used sprue instead.
All of the weapons come from one of the Skywave WW2 IJN weapons sets. This
set is included in the kit and I made use of the various weapons as indicated
in the kit directions. The davits also come from this source. To all intents
and purposes the Freccia is now finished . . . all that is missing is how
to display her. The Base Ship models look best when shown at sea, and the
best way to depict this is using a wooden base with Acrylic Gel or some such
medium to make the sea. I have been too cheap to acquire a decent wooden base
and aren't quite sure of my wavemaking abilities yet, so for now I have an
easier way to show ships in motion . .. cardboard and paint (Ceramcoat again).
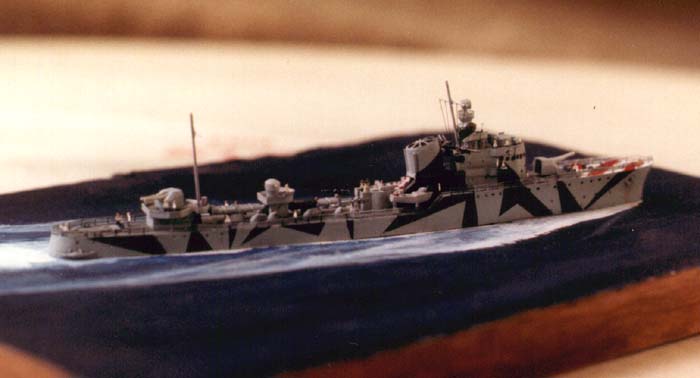 I
began by cutting a slot in a piece of corrugated cardboard to accept the sprue
handhold on the hull bottom. The outline of the hull was now traced and the
entire piece of card was painted Navy Blue, when this was dry other blues
were then randomly painted on the card. After this the area around the hull
was painted in a splotchy white. Blue was painted over this, followed by more
white, more blue and so on until I decided enough was enough and it was done.
Except something didn't look right it was sitting on a piece of cardboard
... it needed to be on a plaque. Four pushpins were then affixed to each of
the underside bottom corners of the base. This resulted in the model being
about 3/4" off the surface now . .. but it still needed something more so
I then glued pieces of file card around the edges and painted them dark brown.
At about this point I realised I could have just turned a box over and painted
the bottom and sides . . . ah well, next time. The piece of sprue on the bottom
of the Freccia was now cut down so just 1/4" or so was sticking out and it
was then fixed to the base using white glue. Later, if I make a 'proper' base,
it can be removed easily enough.
I
began by cutting a slot in a piece of corrugated cardboard to accept the sprue
handhold on the hull bottom. The outline of the hull was now traced and the
entire piece of card was painted Navy Blue, when this was dry other blues
were then randomly painted on the card. After this the area around the hull
was painted in a splotchy white. Blue was painted over this, followed by more
white, more blue and so on until I decided enough was enough and it was done.
Except something didn't look right it was sitting on a piece of cardboard
... it needed to be on a plaque. Four pushpins were then affixed to each of
the underside bottom corners of the base. This resulted in the model being
about 3/4" off the surface now . .. but it still needed something more so
I then glued pieces of file card around the edges and painted them dark brown.
At about this point I realised I could have just turned a box over and painted
the bottom and sides . . . ah well, next time. The piece of sprue on the bottom
of the Freccia was now cut down so just 1/4" or so was sticking out and it
was then fixed to the base using white glue. Later, if I make a 'proper' base,
it can be removed easily enough.
 With
the ship now ready for sea, all that was needed was the crew, Tom's Modelworks'
1/700 PE set came to the rescue here, and 30 or so of them were painted with
white jumpers, dark blue trousers and a flesh blob for the head and hands.
These were then removed from the fret and then placed onboard after first
having them step in a puddle of CA. I am amazed at how much they add to the
appearance of the completed model and I will have to acquire many more sets
to man my other ships.
With
the ship now ready for sea, all that was needed was the crew, Tom's Modelworks'
1/700 PE set came to the rescue here, and 30 or so of them were painted with
white jumpers, dark blue trousers and a flesh blob for the head and hands.
These were then removed from the fret and then placed onboard after first
having them step in a puddle of CA. I am amazed at how much they add to the
appearance of the completed model and I will have to acquire many more sets
to man my other ships.
Conclusion
For a first resin model the Waveline Freccia was an excellent choice, and
I feel more confident in starting the USS San Francisco I mentioned a few
months back - in fact I have already started on the PE details for it. The
PE rails and crew make a world of difference as does a sea base. Thanks to
Hobbylink Japan for the Waveline Freccia, Eduard for the PE rails and Tom's
Modelworks for the PE crew.
Copyright © SMML 2004