 In
the years following World War One, the "War To End All Wars", naval construction
was limited by international treaty. Like all other naval powers, Japan was
restricted to a tonnage limit, with further constraints on the number of vessels
of each type.
In
the years following World War One, the "War To End All Wars", naval construction
was limited by international treaty. Like all other naval powers, Japan was
restricted to a tonnage limit, with further constraints on the number of vessels
of each type.
In the late 1920's Japan was near her limit of tonnage, but had several light
cruisers nearing scrapping. 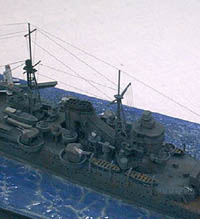 It
was decided to build four new light cruisers, using the then revolutionary
electric welding to save weight, and to design them from the outset to be
capable of conversion to heavy cruisers. These four ships became the Mogami
class - Mogami, Mikuma, Suzuya and Kumano. Problems with the welding of the
first two ships led to Suzuya and Kumano being completed to a modified design,
but all four were nevertheless rather overweight light cruisers.
It
was decided to build four new light cruisers, using the then revolutionary
electric welding to save weight, and to design them from the outset to be
capable of conversion to heavy cruisers. These four ships became the Mogami
class - Mogami, Mikuma, Suzuya and Kumano. Problems with the welding of the
first two ships led to Suzuya and Kumano being completed to a modified design,
but all four were nevertheless rather overweight light cruisers.
 Long
after all four ships met their fate, four Japanese model making companies
decided to produce kits of all of the Japanese WW2 fleet in 1/700 waterline
kit form. First of these - in about 1970 - from Tamiya were the Mogami class,
including the original release of IJN Kumano. Tamiya's kit of IJN Kumano has
been upgraded since then by the addition of sprues of much improved details
- guns, boats, davits, aircraft - but still suffers from simplification of
detail and some minor inaccuracy.
Long
after all four ships met their fate, four Japanese model making companies
decided to produce kits of all of the Japanese WW2 fleet in 1/700 waterline
kit form. First of these - in about 1970 - from Tamiya were the Mogami class,
including the original release of IJN Kumano. Tamiya's kit of IJN Kumano has
been upgraded since then by the addition of sprues of much improved details
- guns, boats, davits, aircraft - but still suffers from simplification of
detail and some minor inaccuracy.
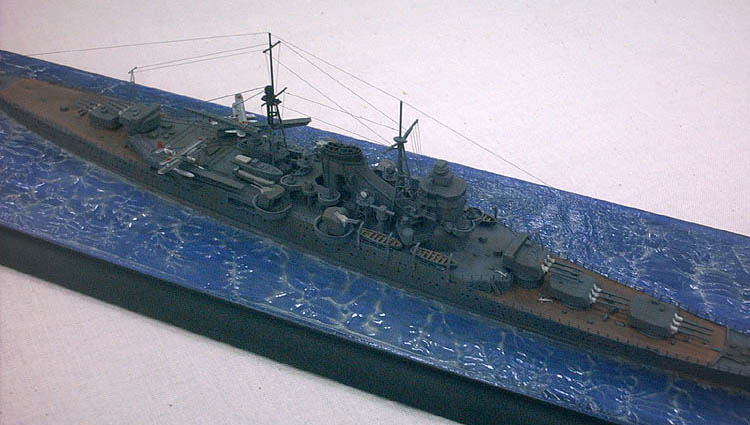
At this point I have to declare that I am not a ship modeller, being rather
more interested in aircraft of the sticks and string World War One variety.
 |
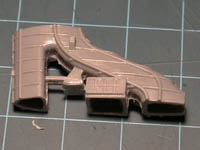
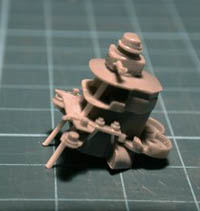
| The bulk of etched brass details are fitted in the midships area.
They include extensive railings, ladders, searchlight towers, catapults,
crane and the tiny but so impressive anti aircraft guns. Also visible
in this picture are the still horribly overscale funnel grill, minor improvements
to the aircraft (by thinning wings and adding struts) and the absence
of torpedo tubes which I shamefacedly admit I omitted after finally deciding
- Enough! |
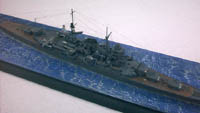
Having decided rather ambitiously that I wanted to build a battleship kit
of that era I needed a crash course in ship modelling techniques. Enter the
Tamiya Kumano, purchased for just $2 Australian at a kit swap. The intention
was to build the model, more or less out of the box, but to use it to practice
adding brass railing and "naval" rigging. Simple, yes?
Simple, no! I found here on the SMML site a superb
article republished here from Dan Jones' sadly defunct "Plastic Ship Modeler."
Dan's lucid descriptions, excellent artwork and enthusiasm caught this modeller
- always a sucker for Advanced Modellers Syndrome - and the project expanded
to fill all the time available. Five pages of scale plans, detail drawings
and descriptive text, added to photographs from other sites provided enough
reference material to do a decent job of this older kit.
Waterline kits of that period were almost all made to a formula - single
piece hull with a steel weight and waterline base, a relatively simple superstructure
and sufficient detail parts to build a model which would be recognisable and
excellent for wargaming. However the kit is neither finely enough detailed
nor really accurate enough for today's modeller. The Kumano kit suffers from
some generic faults of kits of this genre and some inaccuracies due to Tamiya
attempting to use the same hull to produce all four rather different sister
ships.
The generic faults are:
The specific faults are
-
Bridge shape is inaccurate for any of the class, being an approximation
of all of them, but it is at least close to that of Kumano and Suzuya.
-
Aft bridge position is missing windows and platforms and engine room
air intake vents
-
Secondary gun tubs are shielded all round - 360 degrees - but should
not be shielded on the inboard side.
-
No torpedo tubes are provided, just a pair of holes in either side of
the hull.
Since I originally started this model to learn how to apply etched railings
and other naval details, I bought the Gold Medal Models set for Japanese Destroyers
and Cruisers. It was recommended to me as being fine enough to make a big
difference, but also not so fine that a newcomer to ship railings in particular
would have impossible problems. That advice was spot on, and I recommend this
set for anyone with a modicum of modelling experience but just learning about
detailing ships - especially in this tiny scale.
In addition, I bought (entirely against my better judgement) a set of White
Ensign Models 1:700 Etched Brass Japanese Anti Aircraft Guns. These really
must be seen to be believed.
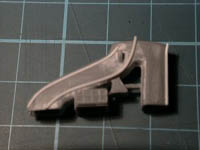
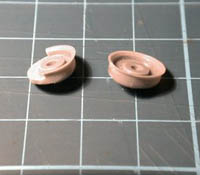 |
| The secondary armament is fitted in gun tubs which overhand the ship's
side. Tamiya has moulded them as fully surrounded by a splinter shield
(right) but the shield actually only surrounds about 210 degrees of the
periphery. The tub on the left has been reshaped - further improvenment
includes removing the raised mounting ring to prevent the updated gun
mounts sitting far too high |
Unfortunately, I can't see them at all without major magnification! They
were a hell of a trial to make - and I wrecked a couple along the way - but
wow, what an improvement over even the upgraded plastic parts.
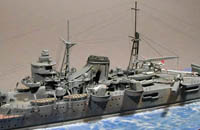
A step by step guide to my model would be long and rather tedious, so it's
best to hit a few highlights supported by photographs.
Most of the model, the masts and all of the bridge railings were completed
before any painting was done. Then the foredeck and quarterdeck were sprayed
red-brown to represent linoleum, masked, and the entire ship sprayed with
dark grey. Once the masking was removed the ship was tack glued to a temporary
base and the remaining parts - mainly armament, railings, ladders, boats and
rigging - were added.
Installing brass railing is an art that can only be learned through practice.
There are numerous books, many Internet descriptions of how to do it, and
any ship modeller will be willing to explain. All helpful, but I had my unhappy
moments until I developed a solution for different situations that worked
for me. In general, sections were cut and fitted working from
inboard to outboard, held in place with tacky glue or scraps of masking tape
until finally set with cyano, then the tacky glue washed away with a wet brush.
A touch up with a fine paint brush hides the worst glue spots and covers the
inevitable sections where paint rubs off. Other shiny spots from the glue
disappear when a final dull coat is applied.
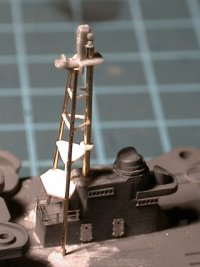 |
| Masts are almost always way over scale in 1:700 kits. The Kumano
mast was improved - but still overscale to allow for strength - by rebuilding
in brass and plastic rod with plastic platforms added to correct one of
the Tamiya faults. The aft superstructue is improved with watertight doors,
ladders, portholes and windows. Later a topmast and yards were included
using soldered brass for enough strength despite thin sections |
Ship rigging is another arcane art. My model Kumano has simplified - very
simplified - rigging, but by using the finest fly tying thread (Dairiki 9X)
held with cyanoacrylate glue the rigging is so fine as to virtually disappear.
In this scale this gives an impression of being far more comprehensive than
it is in fact.
 |
| The bridge is lacking in detail, especially the important internal
tripod which was essential to provide sufficient strength to mount the
heavy rangefinder and fire control system. Each of the platforms has been
thinned and holes drilled to allow insertion of tripod legs from plastic
rod. These were trimmed to fit when the bridge structure was added to
the model. Extra supports have been added beneath the light anti-aircraft
and director tubs and the sloping front of the lower bridge improved in
shape. Later, further portholes are added, and bridge window frames provided
using a length of brass ladder lying on it's side |
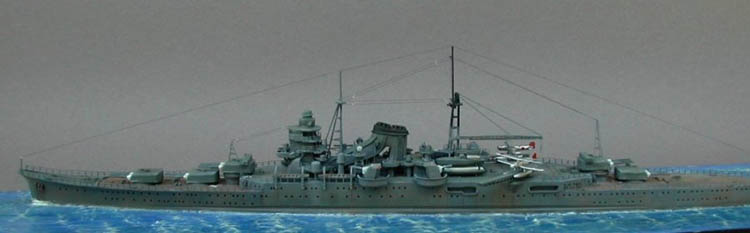
Finally, the ship is weathered quite heavily using a variety of chalk pastels
and watercolour pencils. I ended up doing this far more brutally than I'd
intended after a disaster with clear flat varnish left an uneven finish. That
took a lot more effort to "bring together" than I'd actually wanted. Dark
grey pastel represents soot on the upper works and ground in grime on decks.
Various rust tones in streaks and vague areas of discolouration disfigure
the hull and parts of the superstructure, being careful to ensure the pattern
of rusting matches as far as possible the few photos of this and similar ships
after long periods of heavy use at sea.
Some final comments are worth including.
The GMM set is excellent, but it's a shame that it doesn't include at least
three catapults. That would allow a modeller to use it to detail a heavy and
a light cruiser, plus a destroyer, just by buying some extra railings and
ladders. I suppose the intention is to ensure the maximum sales, but it may
instead bring me to using the products of another manufacturer.
My model is painted in Gunship Grey aircraft enamel. It's probably far from
the "authentic" colour, but you can buy first class paints said to be correct
for this ship. Then, after fading, and weathering, and washing and a coat
of flat, it'll look quite unlike it was out of the can. At least your starting
point will be close but don't blame me if no-one else can tell!
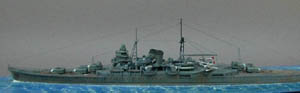
 This
was an enjoyable project, and the result is extremely pleasing to my inexpert
eye. It did prove that an old dog can learn a few new tricks, and that old
models need not be consigned to the scrap heap of history. However, as Tamiya
will soon release (or maybe already has) a superb new mould kit of this very
ship I wonder if many more modellers will travel this path. Perhaps not, but
don't discount this and the many other good basic ship models available, which
with good references, a few added details and some minor corrections can produce
models capable of taking their place alongside the best new kits.
This
was an enjoyable project, and the result is extremely pleasing to my inexpert
eye. It did prove that an old dog can learn a few new tricks, and that old
models need not be consigned to the scrap heap of history. However, as Tamiya
will soon release (or maybe already has) a superb new mould kit of this very
ship I wonder if many more modellers will travel this path. Perhaps not, but
don't discount this and the many other good basic ship models available, which
with good references, a few added details and some minor corrections can produce
models capable of taking their place alongside the best new kits.
Note: Shane's IJN Kumano took 1st Place in the Ships Modified category at
the 2003 Queensland Model
and Hobby Expo (QMHE).
Copyright © SMML 2004
 In
the years following World War One, the "War To End All Wars", naval construction
was limited by international treaty. Like all other naval powers, Japan was
restricted to a tonnage limit, with further constraints on the number of vessels
of each type.
In
the years following World War One, the "War To End All Wars", naval construction
was limited by international treaty. Like all other naval powers, Japan was
restricted to a tonnage limit, with further constraints on the number of vessels
of each type.  It
was decided to build four new light cruisers, using the then revolutionary
electric welding to save weight, and to design them from the outset to be
capable of conversion to heavy cruisers. These four ships became the Mogami
class - Mogami, Mikuma, Suzuya and Kumano. Problems with the welding of the
first two ships led to Suzuya and Kumano being completed to a modified design,
but all four were nevertheless rather overweight light cruisers.
It
was decided to build four new light cruisers, using the then revolutionary
electric welding to save weight, and to design them from the outset to be
capable of conversion to heavy cruisers. These four ships became the Mogami
class - Mogami, Mikuma, Suzuya and Kumano. Problems with the welding of the
first two ships led to Suzuya and Kumano being completed to a modified design,
but all four were nevertheless rather overweight light cruisers. 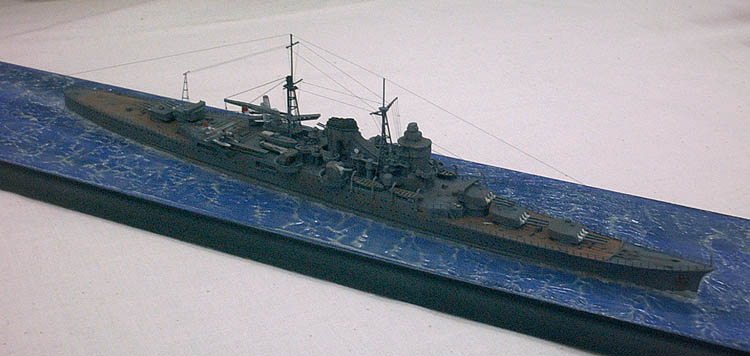 Long
after all four ships met their fate, four Japanese model making companies
decided to produce kits of all of the Japanese WW2 fleet in 1/700 waterline
kit form. First of these - in about 1970 - from Tamiya were the Mogami class,
including the original release of IJN Kumano. Tamiya's kit of IJN Kumano has
been upgraded since then by the addition of sprues of much improved details
- guns, boats, davits, aircraft - but still suffers from simplification of
detail and some minor inaccuracy.
Long
after all four ships met their fate, four Japanese model making companies
decided to produce kits of all of the Japanese WW2 fleet in 1/700 waterline
kit form. First of these - in about 1970 - from Tamiya were the Mogami class,
including the original release of IJN Kumano. Tamiya's kit of IJN Kumano has
been upgraded since then by the addition of sprues of much improved details
- guns, boats, davits, aircraft - but still suffers from simplification of
detail and some minor inaccuracy.