Background
 This
modelling project follows I guess my latest theme which is modelling subjects
that I've had the opportunity to visit, photograph and/or crawl over on a
recent overseas business trip.
This
modelling project follows I guess my latest theme which is modelling subjects
that I've had the opportunity to visit, photograph and/or crawl over on a
recent overseas business trip.
The Liberty Ship as a modelling subject, specifically stems from a tour I
took of the SS Jeremiah O'Brien which is berthed in San Francisco harbour.
The ship has been restored to working order by a group of dedicated volunteers,
and periodically cruises San Francisco harbour to change the air in the boilers
and give the barnacles a change of scenery. The ship notably, took part in
the 50th anniversary of Normandy.
Most readers would have some familiarity with the history and purpose of the
Liberty Ship in WWII. It is memorable for it's mass production techniques,
it's revolutionary (for the time) welded vs riveted construction, and for
it's far longer than expected useful lifespan.
One notable record is the 8 days from keel-laying to despatch on war duties
of one 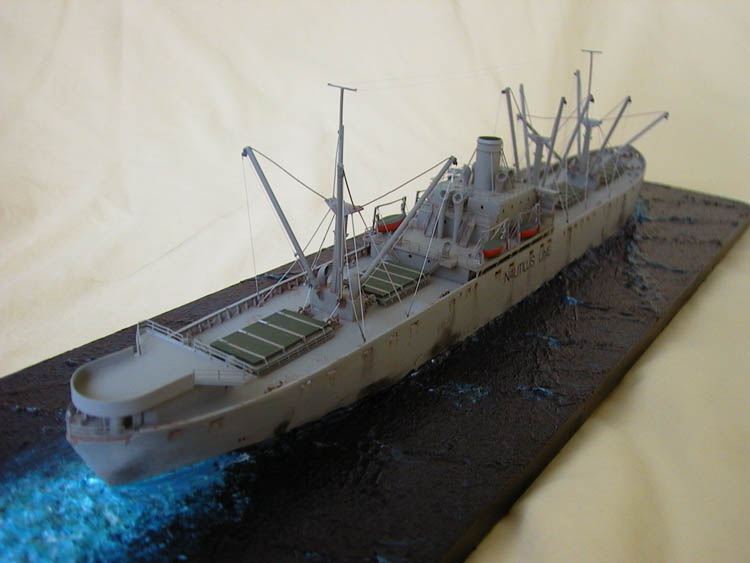 particular
ship being the Robert E. Peary. Greatly facilitated by the assembly of sub-sections
which were themselves constructed 'off-site' from obviously limited wartime
slip facilities. Readers are referred to the book 'Liberty Ships in Peacetime'
for a more complete history of construction. By the end of hostilities, 2710
Liberty's had been completed, with over 900 subsequently sold and deployed
to foreign countries to assist with the re-establishment of freight operations.
This 900 in addition to those which had been supplied during wartime under
Lend Lease arrangements. Obviously with merchant shipping having been decimated
as a result of the war and war service, the Liberty ship had a crucial post-war
role to fill.
particular
ship being the Robert E. Peary. Greatly facilitated by the assembly of sub-sections
which were themselves constructed 'off-site' from obviously limited wartime
slip facilities. Readers are referred to the book 'Liberty Ships in Peacetime'
for a more complete history of construction. By the end of hostilities, 2710
Liberty's had been completed, with over 900 subsequently sold and deployed
to foreign countries to assist with the re-establishment of freight operations.
This 900 in addition to those which had been supplied during wartime under
Lend Lease arrangements. Obviously with merchant shipping having been decimated
as a result of the war and war service, the Liberty ship had a crucial post-war
role to fill.
Over the ensuing years, the ships were replaced by more modern, speedier and
efficient designs, with the old Liberty's being passed down the line to flags
of steadily greater convenience or to the shipbreakers! Through the 1950's,
and 1960's there was steady attrition mostly for conventional sea-going reasons,
and occasionally due to more structural issues such as welding failures, props
falling off etc. Very few 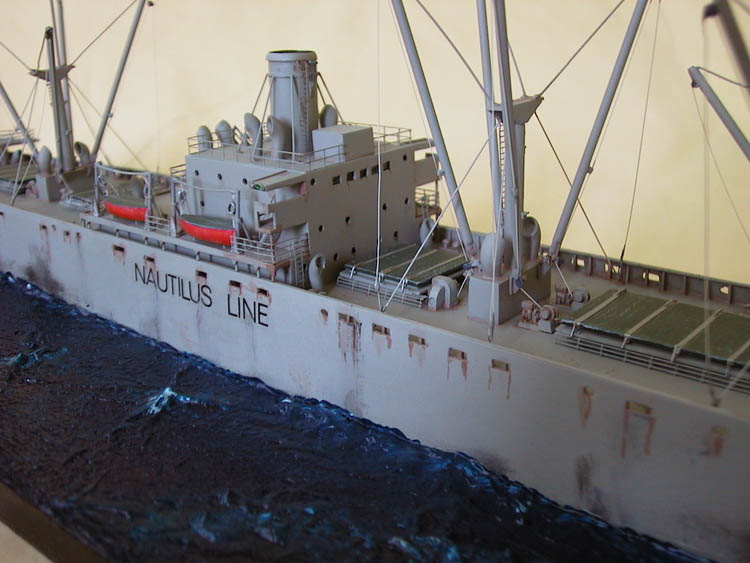 remained
in operation in the 1970's and there are now thought to be just 2 survivors.
Both of these survivors have been restored to their wartime service regalia
the SS Jeremiah O'Brien based in San Francisco and the SS John W. Brown
elsewhere in the USA.
remained
in operation in the 1970's and there are now thought to be just 2 survivors.
Both of these survivors have been restored to their wartime service regalia
the SS Jeremiah O'Brien based in San Francisco and the SS John W. Brown
elsewhere in the USA.
 Through
their post-war lives, it would seem most Liberty ships underwent a series
of transformations to improve practical items such as living conditions, navigability
etc. Defence paraphenalia was usually the first thing to disappear there
being little need for either the guns or the gun emplacements on coastal routes!
Often the wheelhouse would either be extended or moved up a deck and living
quarters likewise extended either upwards or outwards. More drastic modifications
such as lengthening of hulls, more advanced crane facilities also were to
be found. Careful checking of reference material would be necessary to get
the right result.
Through
their post-war lives, it would seem most Liberty ships underwent a series
of transformations to improve practical items such as living conditions, navigability
etc. Defence paraphenalia was usually the first thing to disappear there
being little need for either the guns or the gun emplacements on coastal routes!
Often the wheelhouse would either be extended or moved up a deck and living
quarters likewise extended either upwards or outwards. More drastic modifications
such as lengthening of hulls, more advanced crane facilities also were to
be found. Careful checking of reference material would be necessary to get
the right result.
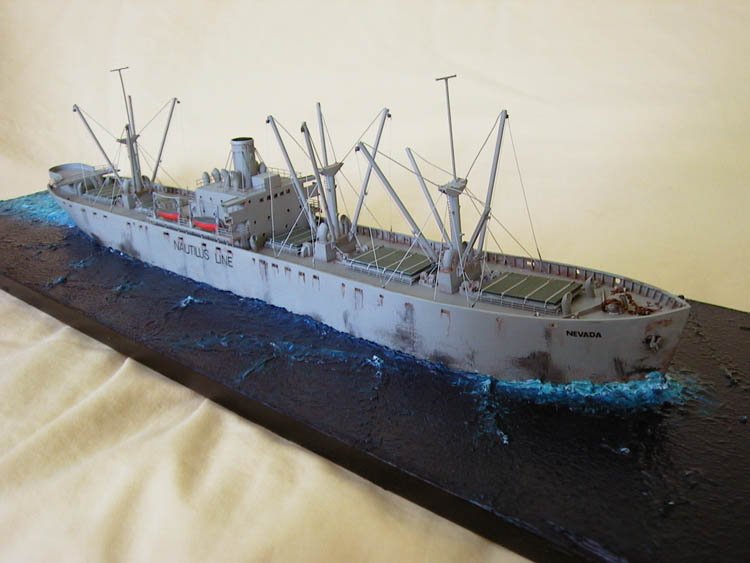
From a modelling perspective, I had the necessary reference material and motivation
to do the Jeremiah O'Brien. However, for something 'different' chose to model
one of the post-war Liberty tramp steamers as something a little more evocative
of the ships role.
Model kits
From a kit perspective there are in fact a number of alternatives, some of which are listed below:-
Skywave released in the late 1990's a 1:700 scale plastic injected Liberty.
I have not spotted the kit in Australia, but a number of kit reviews suggest
this to be up to Skywave's usual standard. It is nevertheless expensive.
Blue Jacket do a large 1:192 scale example with a solid bass-wood hull and
assorted parts in resin and photo-etch. I had the opportunity of an in box
review of this kit whilst in San Francisco and would have bought it at the
time except for the luggage space problem it would have created. At the time
it was $US220 which with shipping costs would amount to a small fortune
in $Aus.
Iron Shipwright also do one in 1:350 which I understand to be a multi-media
kit with resin hull and photoetch parts. Again, price at the time was around
$US150 plus shipping costs which I was unable to justify to myself or the
boss.
Scratchbuilding
 The
turning point in this dilemma was obtaining a decent set of plans from the
excellent Model Shipwright publication. This created the germ of an idea to
scratchbuild the subject. Not as silly as it sounds, in that a waterline hull,
with largely slab sides and a single piece flat deck seemed a reasonable proposition
and the simplistic superstructure didn't phase me overly either. So I was
off and running
..
The
turning point in this dilemma was obtaining a decent set of plans from the
excellent Model Shipwright publication. This created the germ of an idea to
scratchbuild the subject. Not as silly as it sounds, in that a waterline hull,
with largely slab sides and a single piece flat deck seemed a reasonable proposition
and the simplistic superstructure didn't phase me overly either. So I was
off and running
..
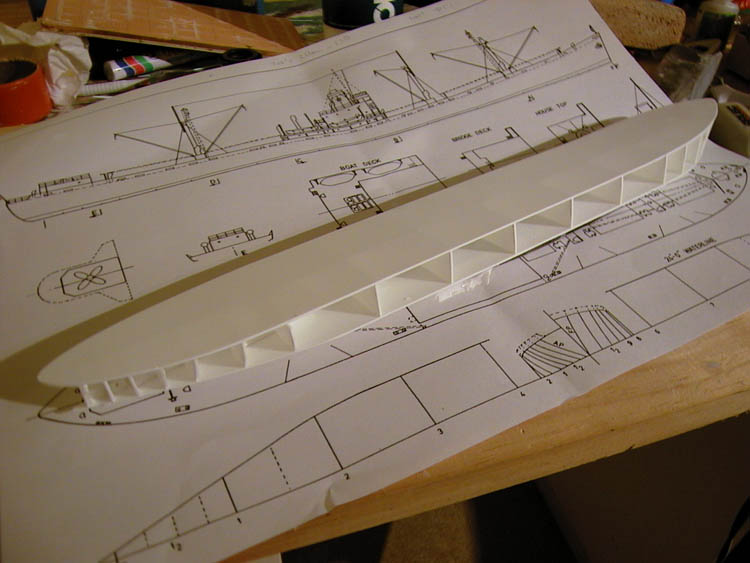
The first step was an enlargement of the plans to 1:350. This was for me the
natural scale to target with the availabilty of 1:350 after market photo-etch.
In 1:350 scale the Liberty is around 330mm long around half a Titanic.
With the plans copied I then proceeded to construct the basic hull using
what I'd call the 'skeleton technique'. A series of vertical styrene cross-sections
glued to the waterline 'backbone' with the cut to size deck fitted over
the top. This 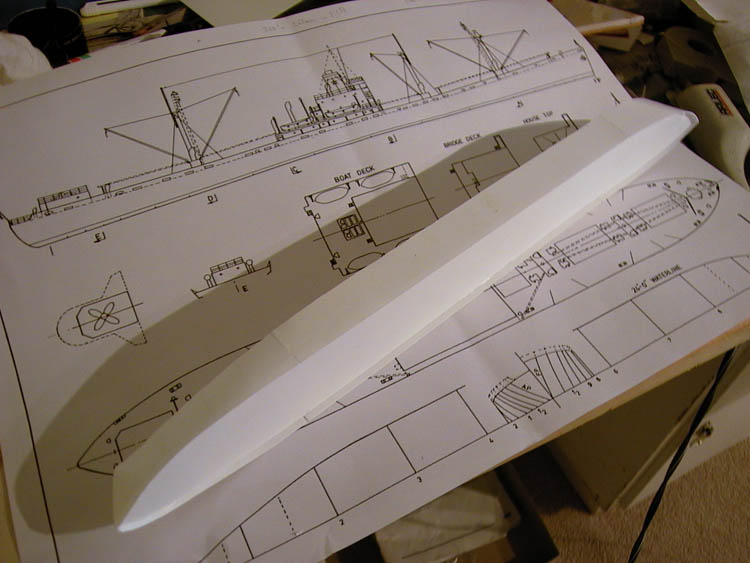 skeleton
was then skinned in 10 thou styrene sheet. Two
skeleton
was then skinned in 10 thou styrene sheet. Two 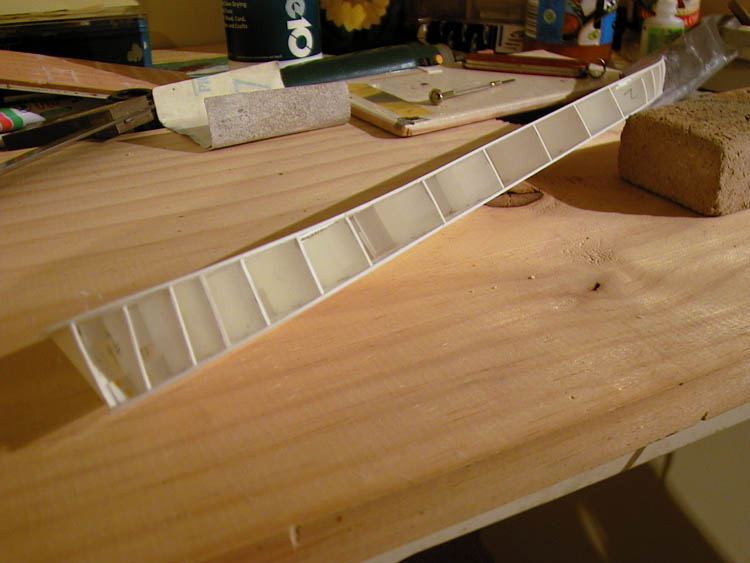 long
rectangular sections for the slab sides then some (temporarily) over-size
rectangles bent, glued and taped to the bow and stern respectively. After
24 hours these sides were cut-down and sanded per the plan view. A small
amount of patching was required with Milliput to provide the basic hull.
long
rectangular sections for the slab sides then some (temporarily) over-size
rectangles bent, glued and taped to the bow and stern respectively. After
24 hours these sides were cut-down and sanded per the plan view. A small
amount of patching was required with Milliput to provide the basic hull.
The Liberty ship has high bulwarks basically right around the hull. Into these
are numerous holes to let the water run-out and for mooring ropes, (excuse
my ignorance of nautical terms). Some of these are circular, some rectangular
and some oval shaped. I initially marked and drilled all out, then filed/scalpeled
as appropriate to produce the required effect. The bulwarks were 'capped'
with a rail of some 1mm thickness 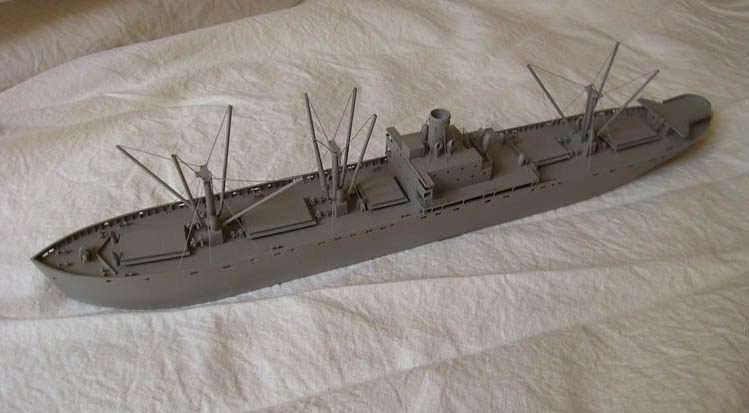 which
was manufactured from plastic strip (for the straight bits) and from cut to
size sheet plastic for the bow and stern sections. The bulwarks are supported
by a series of stanchions which are spaced roughly every 4ft. In
which
was manufactured from plastic strip (for the straight bits) and from cut to
size sheet plastic for the bow and stern sections. The bulwarks are supported
by a series of stanchions which are spaced roughly every 4ft. In 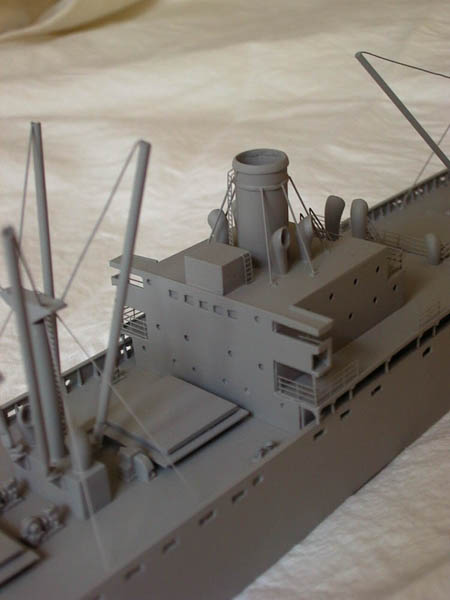 1:350th
scale these definitely had to be replicated. I hand-cut a series of these
from thin plastic strip using a cutting master to ensure consistent shape.
They were then individually tweezed and liquid cemented into place. All in
all, a tedious process, but the result of which I am well pleased with.
1:350th
scale these definitely had to be replicated. I hand-cut a series of these
from thin plastic strip using a cutting master to ensure consistent shape.
They were then individually tweezed and liquid cemented into place. All in
all, a tedious process, but the result of which I am well pleased with.
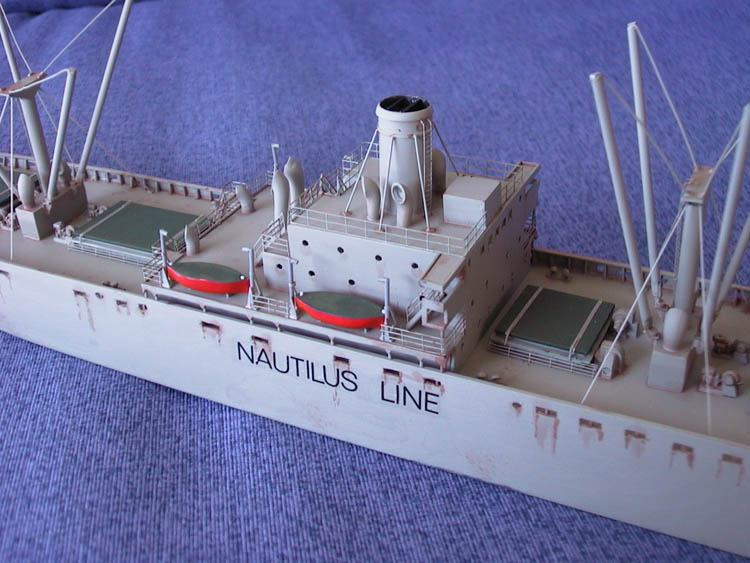
The main superstructure was built in sections the various decks and bridge
structures being built up from 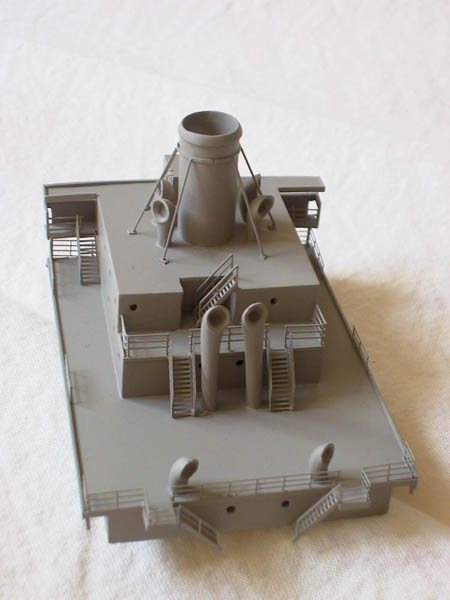 thin
plastic sheet. This I found to be fiddly but rewarding work. I found that
with some careful upfront planning and thinking, you can construct these various
rectangular boxes so that the join lines from the lower 'boxes' are concealed
by the structures on top. Pre-construction, I drilled out the portholes. Internally,
I installed a number of blanking off pieces to ensure that daylight couldn't
be seen through the final product. These were painted and liquid-cemented
together in logical sections.
thin
plastic sheet. This I found to be fiddly but rewarding work. I found that
with some careful upfront planning and thinking, you can construct these various
rectangular boxes so that the join lines from the lower 'boxes' are concealed
by the structures on top. Pre-construction, I drilled out the portholes. Internally,
I installed a number of blanking off pieces to ensure that daylight couldn't
be seen through the final product. These were painted and liquid-cemented
together in logical sections.
The funnel is rather straightforward being a basic cylinder with a full
diameter securing strap onto which a selection of stays were affixed. I used
some plastruct tubing for the funnel with strip plastic for the securing
strap and stretched sprue for the stays. The standard baffles inside the funnel
were fitted as was photo-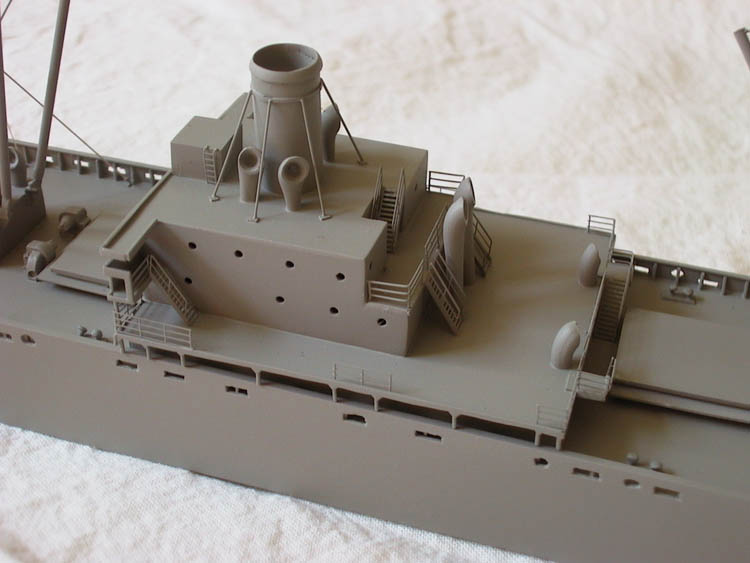 etch
ladders and ship's whistle (or is it a horn?).
etch
ladders and ship's whistle (or is it a horn?).
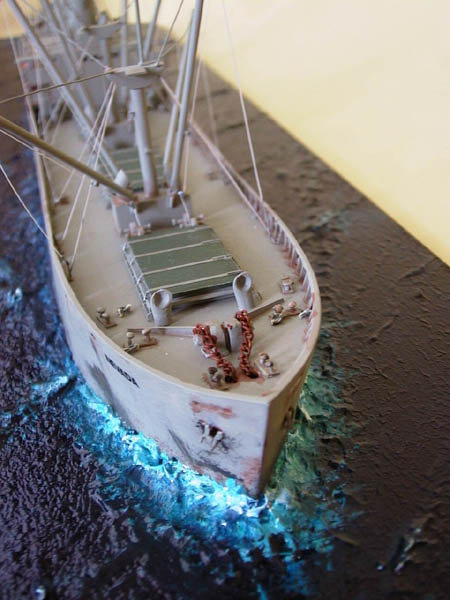
There are five holds in the ship these being secured with, I believe, canvas
covered 'lids'. The holds and their hatch covers were replicated by sandwiching
4 different sizes and different thicknesses of plastic card together. The
hatches were edged with some cut-down photo-etch railing to imitate some of
the finer detail, with modelling tape and  stretched
sprue used to replicate the tie-down straps.
stretched
sprue used to replicate the tie-down straps.
Each hold is serviced by either two or four crane booms there being ten
booms (or in some cases twelve) in total, mounted on three masts. These were
constructed using aluminum tube for the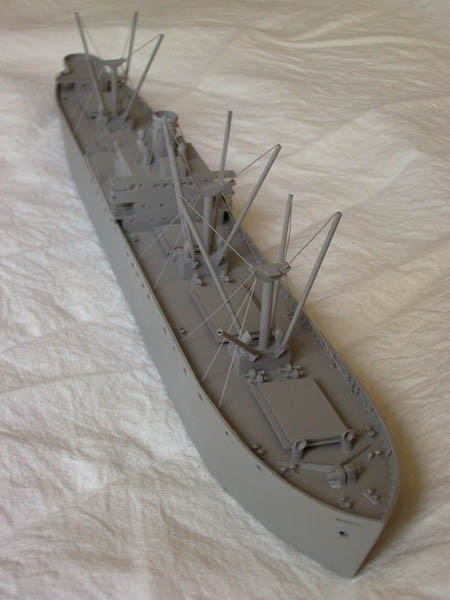 masts, mounted in a plastic sheet mast footing with mast detail picked out
with sheet and strip plastic. The booms were cut from small diameter aluminium
tubing with mounts and pivot points from shaped plastic. Once in place, rigging
was completed using a combination of stretched sprue, fuse wire and some photo-etch.
masts, mounted in a plastic sheet mast footing with mast detail picked out
with sheet and strip plastic. The booms were cut from small diameter aluminium
tubing with mounts and pivot points from shaped plastic. Once in place, rigging
was completed using a combination of stretched sprue, fuse wire and some photo-etch.
Rails, ladders etc. were sourced from the 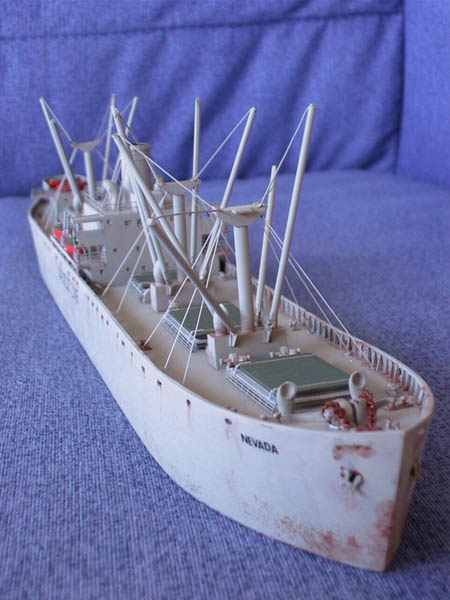 Gold
Medal set of merchant shipping (actually a set originally intended for my
1:350 scale Titanic which has been relegated to the 'I'll do that later' category).
These were attached with what I'd imagine are standard techniques cut and
bent to size with scalpel(s), glued with superglue. Winches, engines etc.
were largely sourced from the spares box the Titanic contributing some of
these. Bollards were constructed from plastic strip and stretched sprue with
the end melted to a 'blob'. Ships anchor chains were sourced from a defunct
piece of jewelry, (no, not my wife's), with the anchors themselves being scratchbuilt
from plastic strip and stretched sprue.
Gold
Medal set of merchant shipping (actually a set originally intended for my
1:350 scale Titanic which has been relegated to the 'I'll do that later' category).
These were attached with what I'd imagine are standard techniques cut and
bent to size with scalpel(s), glued with superglue. Winches, engines etc.
were largely sourced from the spares box the Titanic contributing some of
these. Bollards were constructed from plastic strip and stretched sprue with
the end melted to a 'blob'. Ships anchor chains were sourced from a defunct
piece of jewelry, (no, not my wife's), with the anchors themselves being scratchbuilt
from plastic strip and stretched sprue.
Ventilators proved initially a bit of a dilemma. Working off a recommendation
from APMA member Lindsay
Charman, I experimented with sections of round sprue. 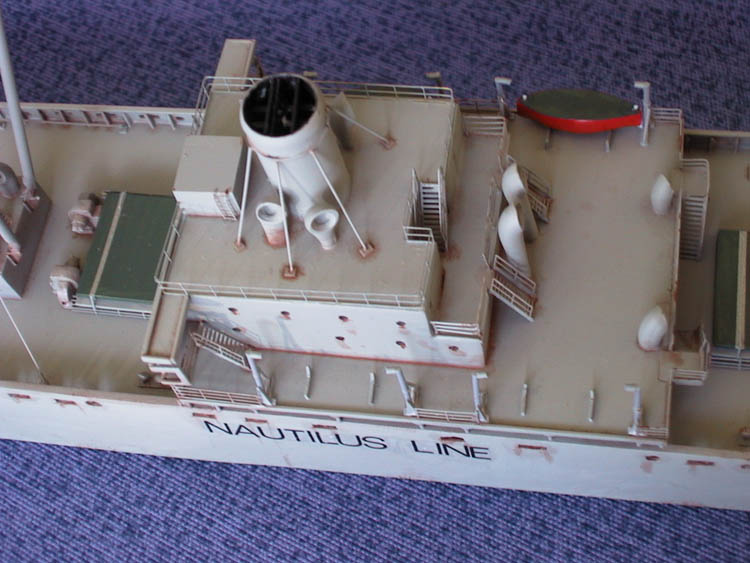 Initially
melting the sprue as you would for a sprue stretching task, simply create
a sharp Z shape without actually stretching the sprue. Once cooled each
Z shape can be cut to produce two ventilators these having their fat end
drilled out with a Arlec 12V engraver. Starting with thicker or thinner sections
of sprue provides the necessary range of sizes. I would assume aftermarket
ventilators are available, however I was unable to source these myself.
Initially
melting the sprue as you would for a sprue stretching task, simply create
a sharp Z shape without actually stretching the sprue. Once cooled each
Z shape can be cut to produce two ventilators these having their fat end
drilled out with a Arlec 12V engraver. Starting with thicker or thinner sections
of sprue provides the necessary range of sizes. I would assume aftermarket
ventilators are available, however I was unable to source these myself.
The actual ship I had selected to model was photographed in 1958 and was looking
much the worse for wear. Rust streaks, mooring abrasions, and general lack
of maintenance was generally evident. Heavy weathering was going to be call
for. I commenced the task by painting the hull with successive layers of rust
brown, black and light grey to provide some opportunity for future 'distressing'.
For achieving the weathered effect, I used a combination of distressing (sanding/scraping
back some of the paint layers), as well as the more conventional washes, dry
brushing and fine painting. I used enamels, artists oils, artists acrylics
and pastels to get a combination of effects..
 Radio
antenna I mounted last being fairly simplistic construction from finely
stretched sprue mounted on some T section poles atop the crane masts. Markings
was restricted to the ships name and shipping lines name both of which I
replicated with rub-down lettering on clear decal sheet. These were in fact
applied before completion of the weathering process indicated above.
Radio
antenna I mounted last being fairly simplistic construction from finely
stretched sprue mounted on some T section poles atop the crane masts. Markings
was restricted to the ships name and shipping lines name both of which I
replicated with rub-down lettering on clear decal sheet. These were in fact
applied before completion of the weathering process indicated above.
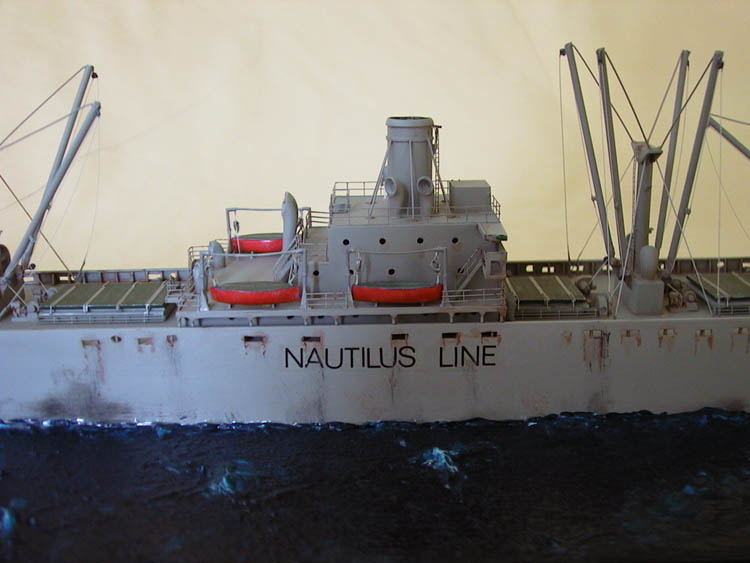
Being a waterline hull, I have mounted the finished ship in an imitation ocean.
Techniques for this have been well covered in other articles. I found a particularly
good technique from an Internet site which involved artists gel medium,
artists acrylics, and polymer gloss varnish. The detail of this is probably
best left for another article.
 All
in all, I found this a most satisfying project, particularly when I'd class
myself as a bit of a novice shipbuilder (you can probably tell by my struggles
with nautical terms in the above!). There are a few other projects on the
agenda of a similar nature now once I get the modelling table cleared of
its current occupants.
All
in all, I found this a most satisfying project, particularly when I'd class
myself as a bit of a novice shipbuilder (you can probably tell by my struggles
with nautical terms in the above!). There are a few other projects on the
agenda of a similar nature now once I get the modelling table cleared of
its current occupants.
Reference:-
Liberty Ships in Peacetime, I.G.Stewart, Ian Stewart Marine Publications
ISBN 0646059784
Detailed walk-around (swim-around?)
reference of the Jeremiah O'Brien
SS Jeremiah O'Brien San
Francisco harbour if you wanted to get some 1:1 detail.
Copyright © SMML 2003