 Back
in the late 1970's I was a teenager happily building my way through Revell's
old 1/720 "International Series" warships, which I thought were the coolest
things going (dig those moveable turrets and snap-apart hulls-yeah!) Then
Hasegawa released these little beauties
WOW! They just blew me away...all
those limber holes, awesome deck guns, amazing surface detail; even the life
preservers and running lights were molded right in. And they were sooooooooo
tiny! As far as I was concerned, these models were the coolest ever
except
well,
what was up with those solid molded rails?
Back
in the late 1970's I was a teenager happily building my way through Revell's
old 1/720 "International Series" warships, which I thought were the coolest
things going (dig those moveable turrets and snap-apart hulls-yeah!) Then
Hasegawa released these little beauties
WOW! They just blew me away...all
those limber holes, awesome deck guns, amazing surface detail; even the life
preservers and running lights were molded right in. And they were sooooooooo
tiny! As far as I was concerned, these models were the coolest ever
except
well,
what was up with those solid molded rails?
 I
had never added rails of any kind before to my ships, and most of the smaller
scale kits didn't have them. But there they were on the Type VII, hulking
up like some weird basket on the back of that neat little conning tower. It
was a game attempt, but they were hopelessly embedded into a solid hunk of
decidedly non-scale plastic. These goofy things weren't at all up to the level
of the rest of the kit. No problem. A few scrapes of the xacto and they were
history-but then it looked so
NAKED! My small scale ship models usually looked
okay without rails, but on U-Boats they were pretty conspicuous
I
had never added rails of any kind before to my ships, and most of the smaller
scale kits didn't have them. But there they were on the Type VII, hulking
up like some weird basket on the back of that neat little conning tower. It
was a game attempt, but they were hopelessly embedded into a solid hunk of
decidedly non-scale plastic. These goofy things weren't at all up to the level
of the rest of the kit. No problem. A few scrapes of the xacto and they were
history-but then it looked so
NAKED! My small scale ship models usually looked
okay without rails, but on U-Boats they were pretty conspicuous
What to do? I didn't have much experience scratchbuilding, and those intricate
rails looked pretty intimidating. (Remember, this was during the dark days
of the 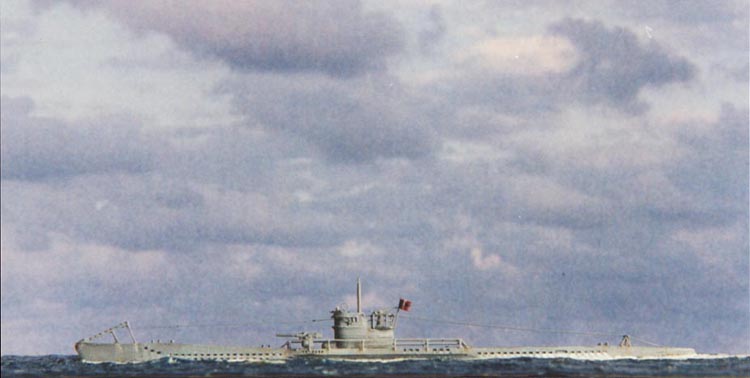 1970s:
the energy crisis, rampant inflation, Watergate, disco, and, worst of all
NO
PHOTOETCH!) First I tried fitting bits of cut down window screen. Awful. Then
I tried tulle wedding veil material (I don't think mom ever noticed those
trimmed edges
) Not much better. Finally, I conceded that my best shot would
be to try it the hard way: wire. I took some fine gauge copper material salvaged
from an old phone cord and started to play around with it. I had taken a pencil
rubbing of the molded rails before scraping them off the hull, so this and
the deck served as guides in bending a piece to match the compound curve of
the top deck. The subtle shape of the Type VII hull toprail was difficult
to capture; it took several tries to get the two sides to not only conform
properly to the deck but to each other. Asymmetrical toprails on that narrow,
exposed deck would have been painfully obvious, so I kept at it until they
looked right.
1970s:
the energy crisis, rampant inflation, Watergate, disco, and, worst of all
NO
PHOTOETCH!) First I tried fitting bits of cut down window screen. Awful. Then
I tried tulle wedding veil material (I don't think mom ever noticed those
trimmed edges
) Not much better. Finally, I conceded that my best shot would
be to try it the hard way: wire. I took some fine gauge copper material salvaged
from an old phone cord and started to play around with it. I had taken a pencil
rubbing of the molded rails before scraping them off the hull, so this and
the deck served as guides in bending a piece to match the compound curve of
the top deck. The subtle shape of the Type VII hull toprail was difficult
to capture; it took several tries to get the two sides to not only conform
properly to the deck but to each other. Asymmetrical toprails on that narrow,
exposed deck would have been painfully obvious, so I kept at it until they
looked right.
 Ok,
so far so good. Now how do I attach these things? Plastic cement wouldn't
work, JB Weld epoxy seemed a bit extreme (and a gawdawful mess to work with).
Krazy Glue had just come on the scene, but I was frankly a little afraid of
the stuff; my experiments with it up to then had succeeded mainly in gluing
my fingers together. I finally opted for an interim solution: Elmer's school
glue would hold the parts in place until I could find a suitable adhesive
for the final bond. It was just a stop-gap measure, but I figured it would
enable me to fabricate the parts and test fit them together temporarily. As
it happened, Elmer's glue by itself worked great. The joints blended nicely
and were surprisingly strong once the glue hardened. Also, the forgiving nature
of white glue made it very easy to work with. This was good, since the wire
parts were all handmade and required a good deal of fiddling to get them shaped
and positioned correctly. The white glue could be loosened by simply rewetting
the joints, making adjustments much simpler and the risk of damage that much
less. It was also nontoxic and non-smelly, a definite plus since I worked
at a desk in my bedroom. The one disadvantage was the tenuous binding power
of the glue to metal and plastics. Not formulated for this type of use, I
expected the Elmer's glue bonds to be exceedingly frail. I need not have worried;
over twenty years later they are still holding fast!
Ok,
so far so good. Now how do I attach these things? Plastic cement wouldn't
work, JB Weld epoxy seemed a bit extreme (and a gawdawful mess to work with).
Krazy Glue had just come on the scene, but I was frankly a little afraid of
the stuff; my experiments with it up to then had succeeded mainly in gluing
my fingers together. I finally opted for an interim solution: Elmer's school
glue would hold the parts in place until I could find a suitable adhesive
for the final bond. It was just a stop-gap measure, but I figured it would
enable me to fabricate the parts and test fit them together temporarily. As
it happened, Elmer's glue by itself worked great. The joints blended nicely
and were surprisingly strong once the glue hardened. Also, the forgiving nature
of white glue made it very easy to work with. This was good, since the wire
parts were all handmade and required a good deal of fiddling to get them shaped
and positioned correctly. The white glue could be loosened by simply rewetting
the joints, making adjustments much simpler and the risk of damage that much
less. It was also nontoxic and non-smelly, a definite plus since I worked
at a desk in my bedroom. The one disadvantage was the tenuous binding power
of the glue to metal and plastics. Not formulated for this type of use, I
expected the Elmer's glue bonds to be exceedingly frail. I need not have worried;
over twenty years later they are still holding fast!
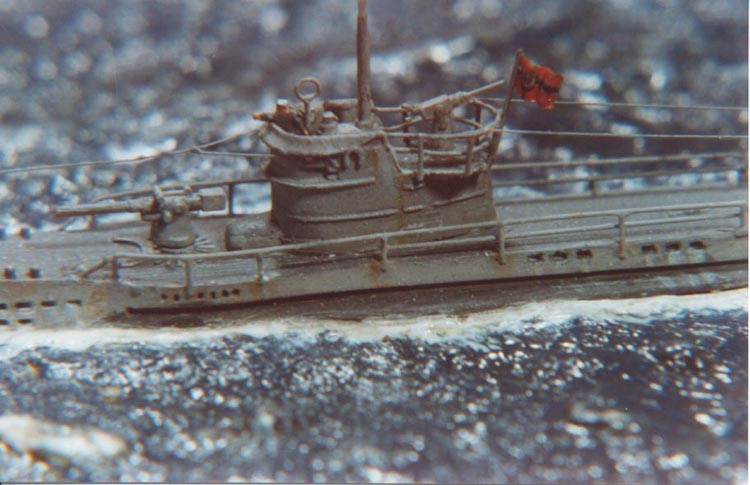
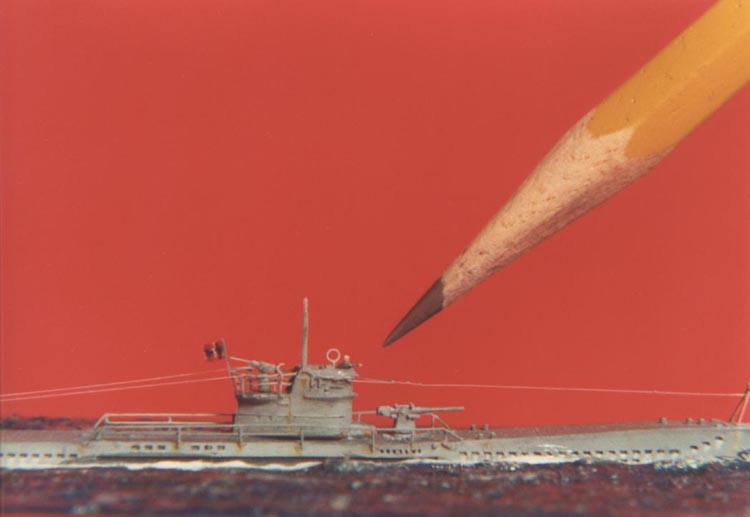
After attaching the toprails the six upright stanchions were cut and positioned following the pattern of the molded rails I had taken off earlier. Finally, the straight horizontal lower rails were cut and placed against the stanchions, each being attached with thinned white glue applied with a #000 paintbrush. I hadn't yet aquired my first airbrush, so the whole assembly was carefully brush painted once the glue had dried.
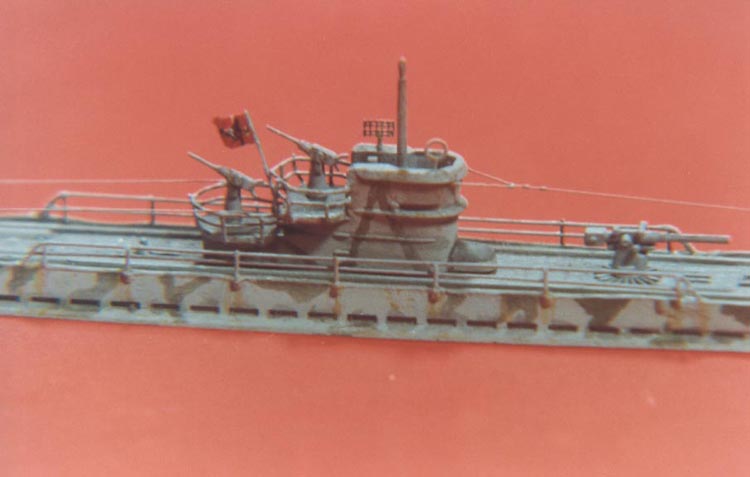
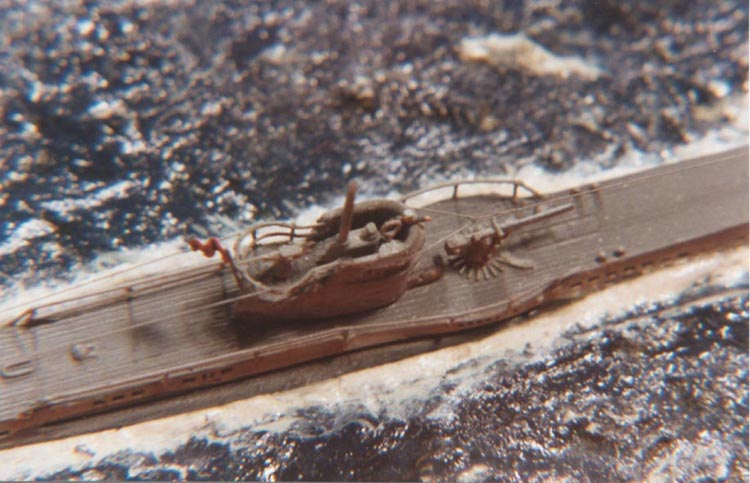 The
next area to be railed was the conning tower. The railing of the Wintergarten
("Greenhouse") on the tower, though considerably more busy looking than the
main deck railing, was actually simpler to accomplish. Lacking the compound
curves of the deck toprail, it was a straightforward matter to form the simple
round shapes of the guardrails. I began with making two rings by wrapping
the wire around nails of the correct diameter. The lower rail was to be slightly
smaller than the upper, so one was formed around a slightly smaller nail than
the other. Otherwise they were identical. Then I bent the ends of each outward
to form the lengths which were to connect them to the tower. Though not complex,
it is important that these rails be even. They form a focal point of the boat,
and any irregularity would be very distracting on the completed model. Also,
the uprights to come would not have sat uniformly if the structure was crooked.
A bit of coaxing was needed to get them right, no big deal.
The
next area to be railed was the conning tower. The railing of the Wintergarten
("Greenhouse") on the tower, though considerably more busy looking than the
main deck railing, was actually simpler to accomplish. Lacking the compound
curves of the deck toprail, it was a straightforward matter to form the simple
round shapes of the guardrails. I began with making two rings by wrapping
the wire around nails of the correct diameter. The lower rail was to be slightly
smaller than the upper, so one was formed around a slightly smaller nail than
the other. Otherwise they were identical. Then I bent the ends of each outward
to form the lengths which were to connect them to the tower. Though not complex,
it is important that these rails be even. They form a focal point of the boat,
and any irregularity would be very distracting on the completed model. Also,
the uprights to come would not have sat uniformly if the structure was crooked.
A bit of coaxing was needed to get them right, no big deal.
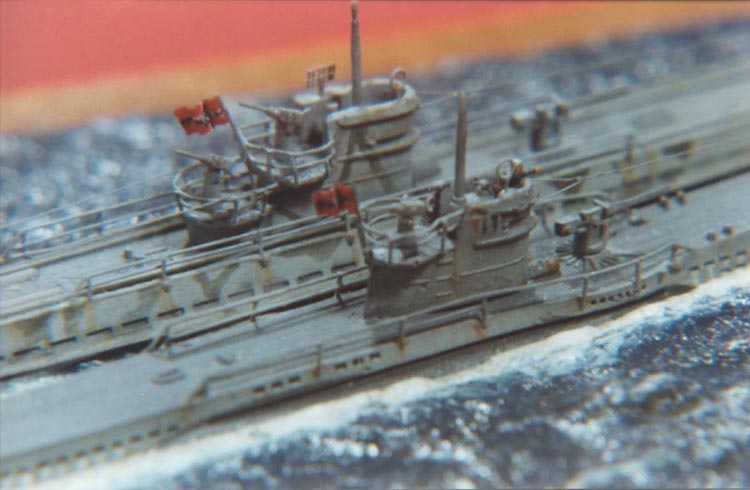 After
I was satisfied with these shapes I attached them to the tower. The unsupported
horizontals had a tendency to droop while the glue was still soft, but propping
the sub vertically on its nose for a few minutes whle the glue thickened took
care of this. Then came the flagstaff and vertical stanchions. I began with
the flagstaff, using wire to replace the oversized kit part. This formed the
anchor of the structure, and all the uprights on the sides were spaced from
it. Progressing from there forward along each side I glued each of the uprights
into place taking care that they were vertical and evenly spaced. With the
horizontals properly aligned these verticals went on easily. This was the
fun part because with the addition of these stanchions the intricate Wintergarten
really came together. When the glue was dry I examined the assembly to make
sure it looked right, rewetting a bit and making minor corrections here and
there. Despite the white glue, which does not bond at all well to metal, the
completed assembly turned out to be quite sturdy. I was able to fix a small
misalignment of the upper and lower horizontals by bending the wire with gentle
pressure from a hobby knife without breaking the tiny glued joints. When I
was satisfied with the shape the glue was allowed to dry thoroughly-not that
that took long, since such miniscule touches of white glue dry in just a few
minutes.
After
I was satisfied with these shapes I attached them to the tower. The unsupported
horizontals had a tendency to droop while the glue was still soft, but propping
the sub vertically on its nose for a few minutes whle the glue thickened took
care of this. Then came the flagstaff and vertical stanchions. I began with
the flagstaff, using wire to replace the oversized kit part. This formed the
anchor of the structure, and all the uprights on the sides were spaced from
it. Progressing from there forward along each side I glued each of the uprights
into place taking care that they were vertical and evenly spaced. With the
horizontals properly aligned these verticals went on easily. This was the
fun part because with the addition of these stanchions the intricate Wintergarten
really came together. When the glue was dry I examined the assembly to make
sure it looked right, rewetting a bit and making minor corrections here and
there. Despite the white glue, which does not bond at all well to metal, the
completed assembly turned out to be quite sturdy. I was able to fix a small
misalignment of the upper and lower horizontals by bending the wire with gentle
pressure from a hobby knife without breaking the tiny glued joints. When I
was satisfied with the shape the glue was allowed to dry thoroughly-not that
that took long, since such miniscule touches of white glue dry in just a few
minutes.
 The
assembly then received a coat of hull gray, lightened slightly to enhance
the contrast. If you apply your finishes by brush as I did exclusively in
those days, it's important to do this with highly thinned paint. It doesn't
cover very well, but ugly paint clumps would have ruined the effect of that
delicate structure. Nevertheless, I made sure to cover it as thoroughly as
I could since any bare spots would show a glaring copper color and give the
game away. I had to go back and touch it up several times; it seemed that
every time I thought it was done, a new viewing angle would reveal a shiny
little spot of copper peeking through
arrgh! The job can be done this way
all right, but I don't recommend it. Life definitely got easier when I bought
my first airbrush!
The
assembly then received a coat of hull gray, lightened slightly to enhance
the contrast. If you apply your finishes by brush as I did exclusively in
those days, it's important to do this with highly thinned paint. It doesn't
cover very well, but ugly paint clumps would have ruined the effect of that
delicate structure. Nevertheless, I made sure to cover it as thoroughly as
I could since any bare spots would show a glaring copper color and give the
game away. I had to go back and touch it up several times; it seemed that
every time I thought it was done, a new viewing angle would reveal a shiny
little spot of copper peeking through
arrgh! The job can be done this way
all right, but I don't recommend it. Life definitely got easier when I bought
my first airbrush!
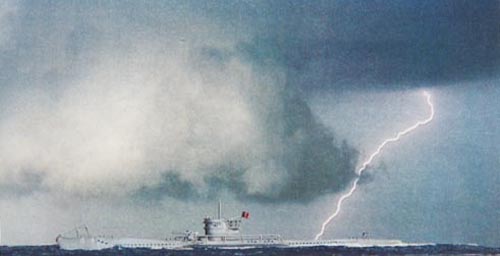
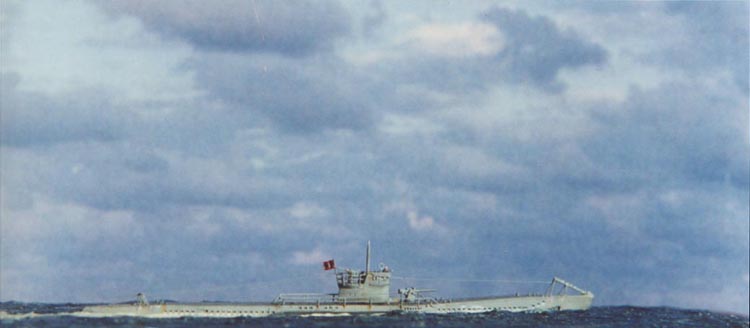
 The
construction of the Type IX Seekuh ("Sea Cow"-I just love that) followed that
of the VII with only minor differences in the models. For some reason Hasegawa
decided not to include the molded railings on the conning tower like on the
Type VII, so removing them was unnecessary. Since the main deck rails on the
Type IX were straight they were easier to make than those on the Type VII.
Otherwise making the railing was much the same on both subs.
The
construction of the Type IX Seekuh ("Sea Cow"-I just love that) followed that
of the VII with only minor differences in the models. For some reason Hasegawa
decided not to include the molded railings on the conning tower like on the
Type VII, so removing them was unnecessary. Since the main deck rails on the
Type IX were straight they were easier to make than those on the Type VII.
Otherwise making the railing was much the same on both subs.
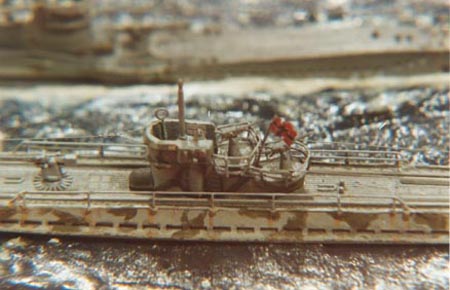
After the rails, fixing up other details was a piece of cake. The FuMo29 centimetric radar unit on the Type IX conning tower came molded on it as a solid block, so I replaced it with a bit of rayon fabric mesh. Much better. Since I had knocked off and lost that nice little RDF loop on the Type VII earlier (Doh!), I made replacements for both subs from wire bent around a needle. This actually worked out well as the new loops came out more delicate looking than the kit originals. Those terriffic kit deck guns inspired me to improve the 20mms, so I cut them from the mounts and repositioned them at more casual angles, with shoulder pads and barrels made from wire.
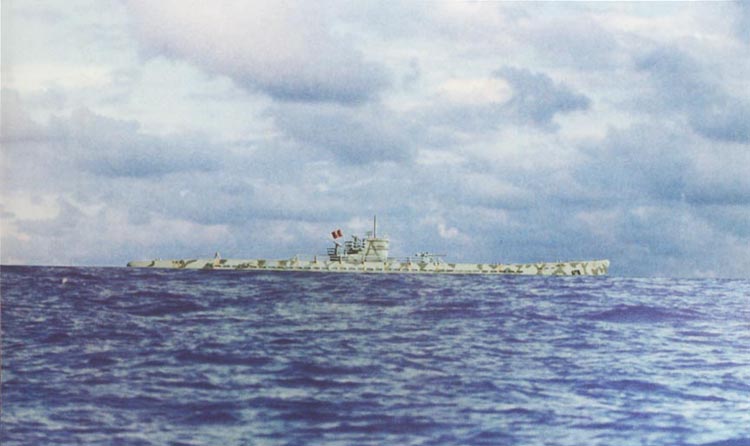
 The
paint job on the Seekuh was just like the Type VII, but with a little extra.
I had seen some pictures of Mediterranean based U-Boats with that funky mottled
camouflage, so I had a ball adding little green splotches all over the hull
and tower. Both boats also received thin washes of dark gray along with liberal
streaks of lightened gray and brown rust to simulate the paint deterioration
universal among World WarTwo-era submersibles. (Of course, "liberal" in tiny
1/700 scale is relative; a light touch was all that was required!)
The
paint job on the Seekuh was just like the Type VII, but with a little extra.
I had seen some pictures of Mediterranean based U-Boats with that funky mottled
camouflage, so I had a ball adding little green splotches all over the hull
and tower. Both boats also received thin washes of dark gray along with liberal
streaks of lightened gray and brown rust to simulate the paint deterioration
universal among World WarTwo-era submersibles. (Of course, "liberal" in tiny
1/700 scale is relative; a light touch was all that was required!)
By the way, it was during this project that I first discovered that brown simulates rust on ship models better than does rust color paint. I found this accidentally when, having run out of my trusty Pactra rust (and too impatient to stop work and make a trip to the toy shop where I bought my paints), I tried some brown instead. The effect was surprisingly good. It was less extreme than the vivid rust paint had been, and much more realistic. If you actually look closely at rust-streaked metal surfaces you will see that the color is mostly a rather dull, dark reddish brown rather than a bright rust color. I was still learning how to weather my ships without having them end up looking like rotting hulks, and the subtler tones of the brown turned out to be a big help.
 Last
came the U-Boat's rigging. Before installing the jump wires I added a net
cutter to the Type VII's bow and small support assemblies to both boats aft
made from wire. The rigging itself was some super fine copper wire I had copped
from an old transistor radio coil. Even though it must be painted, I have
always liked this microfine wire better than fly tippet or stretched sprue
for rigging since it is easier to impart a realistic sag to the scale lines.
It also doesn't loosen or flex with temperature changes. Insulators on the
lines were dabs of white glue. The wires were (oh so gently!) brushed with
highly thinned hull color paint after they were in place. As with the safety
rails, these lines had to be repeatedly touched up to assure that none of
the copper color showed through. When this was done the subs were completed
with Kriegsmarine naval ensigns made from painted binder paper.
Last
came the U-Boat's rigging. Before installing the jump wires I added a net
cutter to the Type VII's bow and small support assemblies to both boats aft
made from wire. The rigging itself was some super fine copper wire I had copped
from an old transistor radio coil. Even though it must be painted, I have
always liked this microfine wire better than fly tippet or stretched sprue
for rigging since it is easier to impart a realistic sag to the scale lines.
It also doesn't loosen or flex with temperature changes. Insulators on the
lines were dabs of white glue. The wires were (oh so gently!) brushed with
highly thinned hull color paint after they were in place. As with the safety
rails, these lines had to be repeatedly touched up to assure that none of
the copper color showed through. When this was done the subs were completed
with Kriegsmarine naval ensigns made from painted binder paper.
I had great fun building these little U-Boats, which, with the exception
of the railings, were among the best kits I had yet seen. Replacing those
rails had definitely been a challenge. They came out all right, but hand making
those things was an effort I wouldn't want-or need-to take on again. Today
there are inexpensive, accurately scaled, simple to use photoetch rails available
which will get the job done in no time. So much easier to get there now than
in the 1970s
!