|
For those of you contemplating the Billings St Roch, here are some pictures which may prove helpful. Please be sure to purchase your Billings kit directly from the Vancouver Maritime Museum and visit the original ship. The ship and the museum need your support as they are a non-profit organisation! The following summary comes from that web site. "The RCMP schooner St. Roch was the first ship to travel the treacherous Northwest passage in both directions, as well as the first ship to ever circumnavigate North America. St. Roch was built in 1928 as a supply ship for isolated, far-flung Arctic RCMP detachments. St. Roch navigated the Northwest Passage from west to east between 1940 and 1942 becoming the first ship to do so and only the second ship to ever travel the Passage. In 1944, St. Roch travelled the more northerly route of the Northwest Passage from east to west, becoming the first ship to do so in both directions. St. Roch was retired in 1948, and was sent to Halifax by way of the Panama Canal in 1950. This voyage made St. Roch the first ship to circumnavigate North America. St. Roch came to Vancouver as a museum ship in 1954, and was brought ashore in 1958. The ship acquired a permanent indoor home and was restored to her 1944 appearance by Parks Canada in 1966." As to the Billings kit? The model builds into a wonderful model, but to be honest it is not the world's greatest kit. I greatly enjoyed building it however. The kit's lines seem to be ok, and the plans reasonably accurate. However, the are some notable errors, for example a snow sled on deck appears on the kit as a hatch cover offset to starboard! Another notable item missing is the ice protection in the form of hull plates around the bow. But again to be fair Billings could not have included this in the kit as anyone planking the hull even slightly differently would not be able to get a preformed bow to fit perfectly. They should have included them on the plans though, and mentioned that the plates needed to be added. I had a lot of success adding these plates with some thin sheet styrene, and pressing the "rivets" out from the inside using a sewing marking wheel. The instructions on this kit are well below the standards most of us are used to, and I had to rely on the plans to complete the kit. I was also very lucky to have the original down the road to check on details. For some reason the Dutch instructions were two to three times longer than the English ones, and I had more success reading those than relying on the English ones. |
|
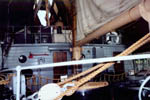
Here is a look at the aft mast to get
an idea of the rigging.
Also visible are how the railing attaches to the davit, and some of the detail of the steering chain anchor pulley |
View of the foc'sle and the bottom of
the main mast.
The curator told me that the red decking is wrong, and was painted as a preservation method. He thought the decks were natural wood originally. Also note the emergency hand pump, and other miscellaneous piping |
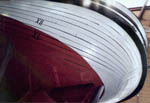
Terrible photo (crawling around under
the ship!) but a good illustration of the bow plates and rivet pattern.
|
|
Nice shot of the steering chain (not
shown on kit), some of the rigging and the rear of the galley.
|
Front of the wheel house and accomodation
deck.
Notice coat of arms, fire hose and piping. The red object in the corner of the picture is a spare rudder carried on deck lashed to the port side. The two lamps on the rail of the observation deck are museum lamps and are NOT part of the ship. |
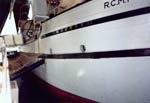
Starboard bow show showing bow plating
stopping at rubbing rail, and just behind last porthole.
Also note observation platform sticking over the side of the starboard rail - this was used for navigating around smaller icebergs, called "growlers" |
|
Stern deck area
|
Starboard stern area
Notice how the steering chain travels down between the ratlines |
Stern quarter
Notice how planking runs change regularly due to the refits and modifications over the years. Also the angled brace on the lifeboat davit. The nets in the lower left are NOT part of the ship - they are to prevent kids climbing on the dry-dock support beam. |
|
Rudder and propeller Notice the safety chain attached to the rudder - this was in case the rudder was ripped off in ice. Notice the slot in the hull above it - this is not on the Billings plans. To create this I just drilled out the keel and planked the edges. |
Nice shot of stern tumblehome Note how the planking runs butt up against the keel timber. The rudder slot is also well illustrated. The steel plate shown is not part of the ship (or so I am led to believe) and is used to support the dry dock support beam. |
Copyright © SMML 2002


