16ft Dinghy & Stowage Set
Great Little Ships - 1/72
By: Les
Brown
Manufactured by David J Parkins, Wales, UK.
This set is one of a series produced specifically to improve the Revell (ex-Matchbox)
Flower Class Corvette kit, but there are also other applications for some of
the sets. This particular set comprises parts to assemble one 16ft Dinghy complete
with deck stowage and davits, and two rope reels.
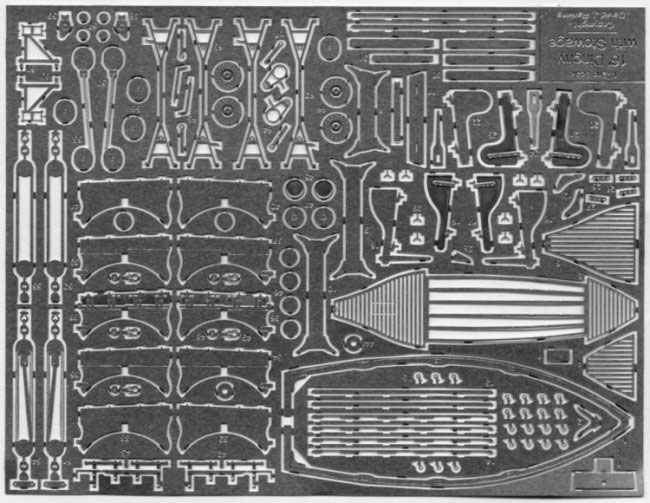
The set arrived in an A4 sized plastic bag containing a piece of card with
the etched brass sheet, the resin moulding and the white metal parts (contained
in separate smaller bags) attached to it, and two sheets of instructions. The
first sheet contains written instructions and the second sheet a diagram of
the assembly, colour coded for the etched brass, resin and white metal parts.
There is also a short length of brown thread but the modelmaker must supply
his own brass rod for the shaft of the rope reels.
 The
resin moulding is of a complete hull with ribs and keel on the inside and planks
on the outside. There were no apparent air holes and only a very small
amount of cleaning up was required before the moulding was ready for use. The
white metal parts consist of two davits, a griping spar and six shafts for the
oars, two short and four long. The remainder of the parts are all clearly laid
out, and numbered, on the etched brass sheet. The brass is reasonably thick
and the connections of the parts to the 'sprue' are quite thick in places making
removal a little difficult, particularly where they occur on curved edges. It
is important to ensure that each of the brass parts is thoroughly cleaned up
where they were connected to the 'sprue' before assembly.
The
resin moulding is of a complete hull with ribs and keel on the inside and planks
on the outside. There were no apparent air holes and only a very small
amount of cleaning up was required before the moulding was ready for use. The
white metal parts consist of two davits, a griping spar and six shafts for the
oars, two short and four long. The remainder of the parts are all clearly laid
out, and numbered, on the etched brass sheet. The brass is reasonably thick
and the connections of the parts to the 'sprue' are quite thick in places making
removal a little difficult, particularly where they occur on curved edges. It
is important to ensure that each of the brass parts is thoroughly cleaned up
where they were connected to the 'sprue' before assembly.
Dinghy
Having cleaned up the resin casting, which required very little effort, I immediately
departed from the instructions. I first made up the bottom boards assembly (parts
3 - 7) and then painted the underside of this assembly and the interior of the
boat itself. In the finished model, it is quite easy to see into these areas and
rather difficult to reach for painting. The use of two layers of etched brass
with strips in different directions is quite an effective way of creating the
necessary square pattern at the fore and aft ends, but as I already have etched
sheets of square mesh at the same size, I wonder why? I then fitted the gunwale
(part 1) and the breasthook (part 2) as instructed at the beginning. The transom
knee (part 28) was also fitted as instructed.
I then bent and fitted the thwarts (parts 8 - 12), having painted the undersides
first. The exact location of these is not always clear but a little thought
and checking to make sure they are both square athwartships and horizontal leads
to the correct location. The bilge keels came next and I found these very difficult.
There are a number of duplicate parts on the sheet and I guess this is in case
you damage the first one. There is no precise location for these parts so I
glued them where seemed appropriate - they looked right in the end!
The next step is the fitting of part 15 - all ten of them! These safety rope
eyes are minute and thank goodness that two spares are provided. I use an illuminated
magnifying glass for much of my modelling and without it I doubt if I would
have even tried to fit these. After some difficulty (I found I could only fit
five at a time without a break), the job was done but the thread was not added
until after painting was complete.
I used the 'British' rudder (parts 16-19), rather than the 'Canadian' one (parts
20-24), and simply wiped superglue along the edges after lamination and then
gently sanded them to ensure that all layers were all level. The hinges were
fitted, followed by the rowlocks - again some very small parts! I was not impressed
with the blade to shaft transitions of the oars as they seemed rather thick,
but a little bit of sanding and a coat of paint produced a reasonable result.
Stowage
Each of the fore and aft chocks are created by laminating together four layers
of brass. In the case of the forward chocks, it is important to use the right
parts, dependant on whether the dinghy is to be stowed on the port or starboard
side. The aft chock is in fact made of the same parts, it is simply the orientation
that changes when mounted on the deck. Again, I wiped superglue along the edges
to seal the joins and then gently filed and sanded. When painted these looked
fine.
It was at this point that the writer of the instructions seemed to have got
fed up. Perhaps if I had the 'Deck & Fittings' set with some of the locations
it would have been easier. Careful examination of the drawings does help with
the pulley assembly, but do be careful to ensure that the engraving representing
the rope strands is on the outside! I decided on the relative locations of the
dinghy and chocks, and the davits by looking at some drawing of H.M.S. Bluebell
which were originally produced by A&A Plans. Parts 60 and 61 appear to need
the small square on the end bent over to double the thickness. There is no mention
of this but the etching has two squares and the diagrams only show one, hence
the fold. The exact location of these parts on the davits is not given but was
decided so as to ensure that the griping spar was at the correct height. The
location of the pulleys (parts 57-59) was really guess work and I assume that
the location of the fairleads (parts 45-47) and the eyebolts (parts 48 and 49)
will be clear on the 'Deck & Fittings' set mentioned above.
Rope Reels
Although there is no mention in the instructions, there are in fact two each of
parts 62 and 63, so I laminated these together in order to increase the thickness
of the supporting frames. Ensure that the frames are stuck along their entire
thickness before trying to bend them or there is a high probability of there being
some 'crinkling'. I fitted the end cheeks of the drums using some very fine brass
rod and then fitted the handles. The handles look too flat to me with no attempt
at reproducing the round handle. This is one of the problems of using etched brass
for some of the items. The reels do need some 'rope' (not supplied) wound round
them to look realistic.
Conclusion
 I
fitted the davits and chocks temporarily to a wooden base so that I could see
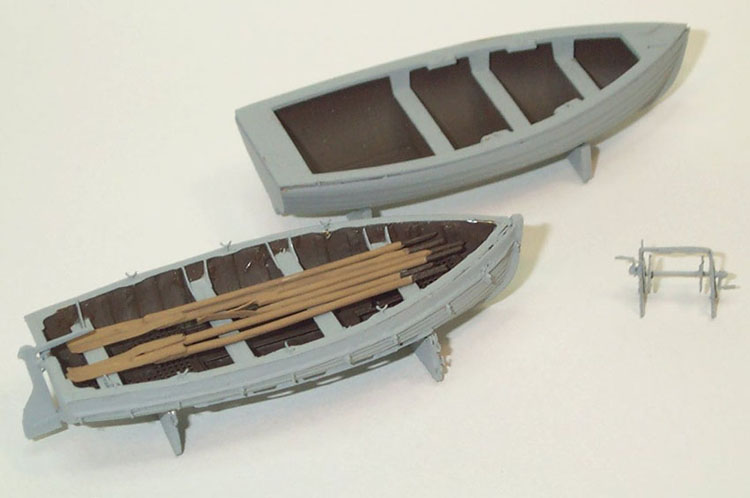
what they looked like. As expected, the comparison with the original kit
item shows a great improvement. The original dinghy (see photograph) consists
of just two parts - the hull with planking on the outside and a smooth inside
except for the floors at both ends, and the gunwale with thwarts moulded in. The
most obvious missing item is the rudder but this could be made from plasticard
if you wished to improve the original - but it would take a lot of work to compare
with this mini-kit. The only problem that I can see, apart from the cost of a
complete set of 'super-detail' kits which altogether is four to five times that
of the original kit, is the use of etched brass where it is not the best medium,
and the time it will take to complete the entire model.
I
fitted the davits and chocks temporarily to a wooden base so that I could see
what they looked like. As expected, the comparison with the original kit
item shows a great improvement. The original dinghy (see photograph) consists
of just two parts - the hull with planking on the outside and a smooth inside
except for the floors at both ends, and the gunwale with thwarts moulded in. The
most obvious missing item is the rudder but this could be made from plasticard
if you wished to improve the original - but it would take a lot of work to compare
with this mini-kit. The only problem that I can see, apart from the cost of a
complete set of 'super-detail' kits which altogether is four to five times that
of the original kit, is the use of etched brass where it is not the best medium,
and the time it will take to complete the entire model.
 The
resin moulding is of a complete hull with ribs and keel on the inside and planks
on the outside. There were no apparent air holes and only a very small
amount of cleaning up was required before the moulding was ready for use. The
white metal parts consist of two davits, a griping spar and six shafts for the
oars, two short and four long. The remainder of the parts are all clearly laid
out, and numbered, on the etched brass sheet. The brass is reasonably thick
and the connections of the parts to the 'sprue' are quite thick in places making
removal a little difficult, particularly where they occur on curved edges. It
is important to ensure that each of the brass parts is thoroughly cleaned up
where they were connected to the 'sprue' before assembly.
The
resin moulding is of a complete hull with ribs and keel on the inside and planks
on the outside. There were no apparent air holes and only a very small
amount of cleaning up was required before the moulding was ready for use. The
white metal parts consist of two davits, a griping spar and six shafts for the
oars, two short and four long. The remainder of the parts are all clearly laid
out, and numbered, on the etched brass sheet. The brass is reasonably thick
and the connections of the parts to the 'sprue' are quite thick in places making
removal a little difficult, particularly where they occur on curved edges. It
is important to ensure that each of the brass parts is thoroughly cleaned up
where they were connected to the 'sprue' before assembly.