IJN Yamato
1/350 photoetched detailing sets
Eduard Vs Gold Medal Models
By: Jens H Brandal
Both sets are designed for the Tamiya kits, and they may not fit other kits
without modification. My sole reference on the Yamato is the Super Illustration
Battleship Yamato (bought from HobbyLink Japan for 2000 yen) and if this is
wrong the conclusions will also be wrong. My apologies in advance if I do. Anyway,
here goes:
Packing and instructions: An envelope with a piece of stiff cardboard
protecting the sheet of etchings and a double sided sheet (slightly longer than
an A4 sheet) of instructions for the GMM set. The GMM instructions give a brief
introduction to handling, shaping and gluing photoetched parts and how railings
and ladders are fitted on real ships. The various sub-assemblies are then described
in detail on how to fit them together. Two views of the superstructure (probably
taken from one of the references mentioned in the instructions at the end) points
out what type of railing goes where. An added bonus is the drawing showing the
position of anti-aircraft artillery for the Yamato's last configuration as the
kit is not entirely accurate in this respect. The plastic kit does not give
you enough parts to model the ship in this configuration, so a second kit will
need to be butchered or you will need to scratchbuild if you can't find someone
with some triple 25mms to spare.
The Eduard set keep their etchings and two double sided instructions in a "half
A4 sized" resealable plastic bag allowing you to see the etchings without removing
them from the bag. Unfortunately, two parts had been bent when the header card
was inserted in the bag, and this was the case in both the sets I looked at.
The part in question is a rib that goes over the fairing where the anchor chain
disappears into the hull so it should be easy enough to bend into shape. The
instructions are Eduard's usual pictorial style which does not give any explanations
how ladders and railings are fitted on board real ships. Instead, they have
several views showing where to fit each item which is a good thing for those
that haven't got the references.
How do the two sets of etchings compare? Not surprisingly, there is a fair
degree of overlapping, but there are a great number of differences too. Following
the GMM instructions, I will compare section by section:
First, catapults: These are best represented by GMM. Not only do Eduard
portray them as open bottomed as 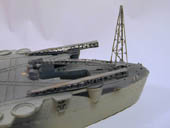 compared
to a box structure in the GMM set, but GMM also gives you ten internal braces
for the structure and the pulley and bracket at the front. This complicates
the assembly of the GMM catapult, but fit is really good and it is not as hard
as it seems, resulting in an impressive looking miniature. The breakdown and
reduced number of parts in the Eduard set makes it easier to assemble, but cannot
attain the visual complexity and accuracy of the GMM item. Both sets include
aircraft trolleys and two types of launch cradles.
compared
to a box structure in the GMM set, but GMM also gives you ten internal braces
for the structure and the pulley and bracket at the front. This complicates
the assembly of the GMM catapult, but fit is really good and it is not as hard
as it seems, resulting in an impressive looking miniature. The breakdown and
reduced number of parts in the Eduard set makes it easier to assemble, but cannot
attain the visual complexity and accuracy of the GMM item. Both sets include
aircraft trolleys and two types of launch cradles.
Aircraft crane: Yet again, the Eduard set will be easier to assemble
as the crane mast simply folds up at the base whereas the GMM will require the
modeller to fold the developed pyramid along three corners. This demands a careful
touch followed by thin flowing superglue, but it will give a structure that
consists of four pieces of angle "steel" rather than the flat "steel" of the
Eduard kit. The jib in the GMM kit has all four sides etched as one, whereas
the Eduard set has the top separate from the bottom and two sides etched as
one. Both will require care and patience to get a good result. GMM gives a choice
of crane rigging which enables the modeller to show the jib in raised or lowered
position, and a small hook. The Eduard set doesn't, but provides a character-building
number of parts (and size) to represent the hinge of the boom and the attachment
for the crane rigging. Combining the Eduard and GMM will make a crane worthy
of study on its own.
Type 13 "GO" radar: I haven't attempted assembling the GMM etching yet,
but surely that must be easier to assemble than the Eduard etching. GMM has
one flat etching with a set of aerials included. Then you fold another etching
and glue to the flat piece, thereby creating the triangular crossection of the
original. Finally, the other set of aerials is fitted to the folded edge of
the structure. Eduard represent this as a three pointed star, requiring the
modeller to fold the sides upwards. Not having tried this in practice, I think
it will be hard to achieve success as the base is virtually impossible to clamp.
This radar only has one set of aerials and they are not as finely etched as
the GMM set.
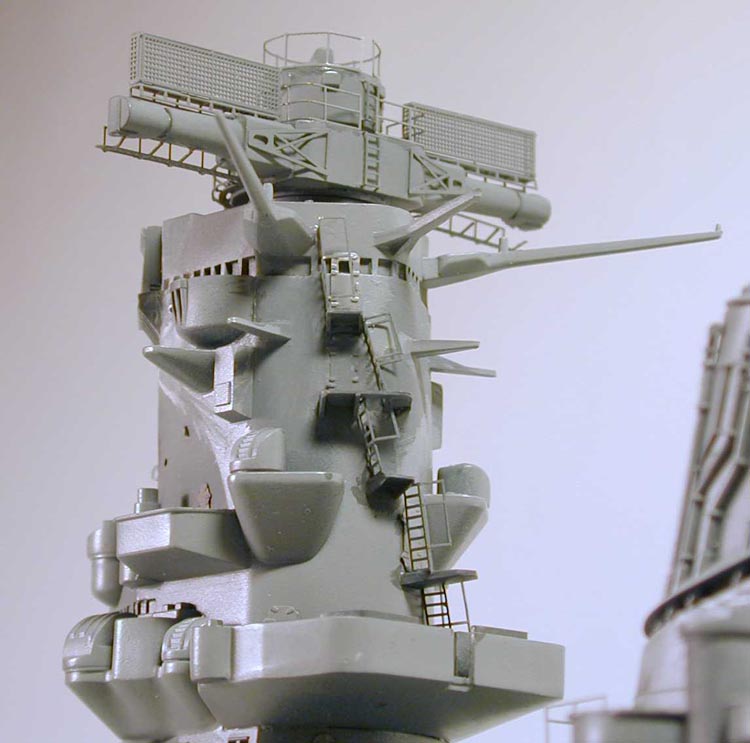
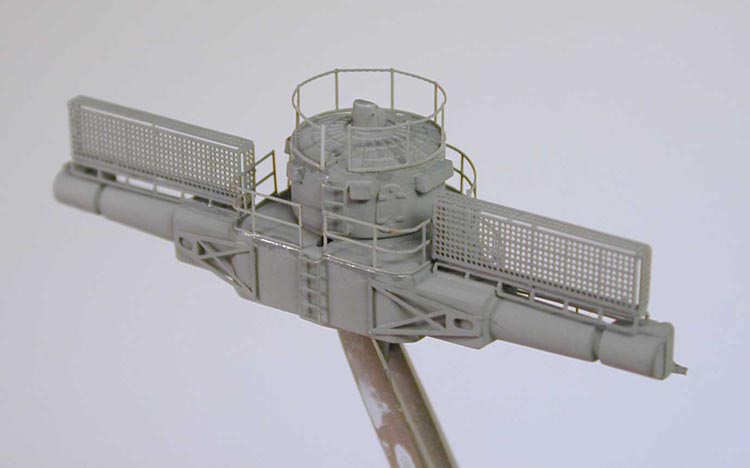
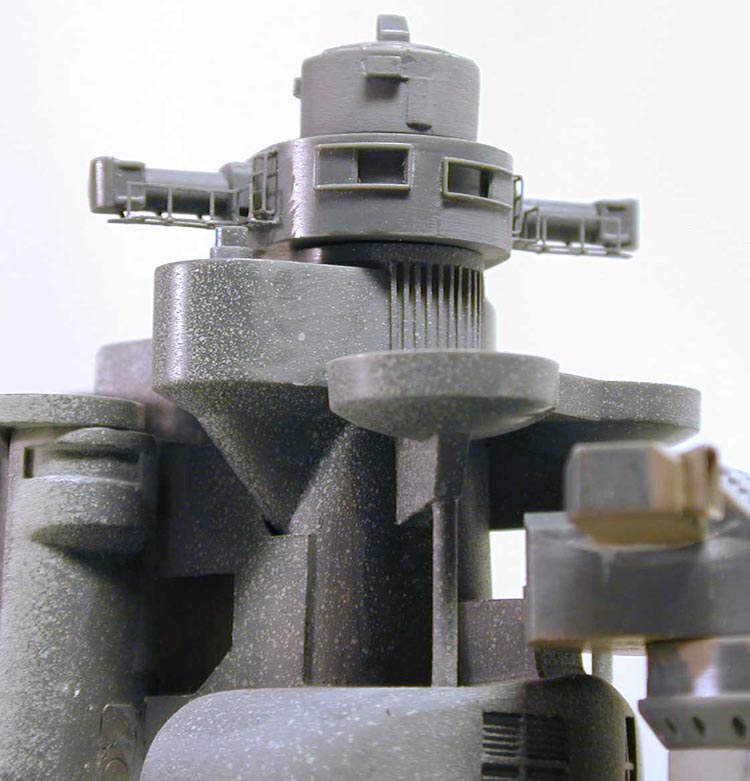
Main director: Eduard's set is the simplest with a crescent shaped walkway
and radar aerials to be folded to an open 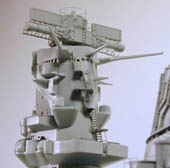 box
(same as GMM), but there is no support structure (which GMM provides). The "mesh"
of the radar is represented as relief etched "dots" in the brass whereas the
GMM is see through. Both sets provide the braces, and this is where the Eduard
set stops. To fit the GMM walkway, you need to remove the overscale Tamiya walkway
beneath the director "arms". Then you will fit the platform provided which goes
under the arms and in front of the center housing. I found it necessary to bend
the small tabs slightly upwards to fix them to the arms.
box
(same as GMM), but there is no support structure (which GMM provides). The "mesh"
of the radar is represented as relief etched "dots" in the brass whereas the
GMM is see through. Both sets provide the braces, and this is where the Eduard
set stops. To fit the GMM walkway, you need to remove the overscale Tamiya walkway
beneath the director "arms". Then you will fit the platform provided which goes
under the arms and in front of the center housing. I found it necessary to bend
the small tabs slightly upwards to fix them to the arms. 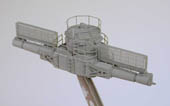 Then
comes the difficult part; bending the platform railing to fit the platform.
First I started curving the center part of the railing around a dowel. Try to
match the curve to the radius of the platform attachments. When you have achieved
the correct radius, then you can bend the railing for the arms at about 90 degrees.
Fit is actually perfect -showing how good the patternwork is. Make no mistakes
about it; you will need two tweezers and two steady hands to get it all together
square and level. Add to this the railing and ladders (cut to length and provided
on the sheet and mentioned in the instructions), this is an area of the model
I am quite proud of, and it isn't finished yet. Putting this main director on
the finished model will be like crowning a king/queen/emperor depending which
part of the world you're in.
Then
comes the difficult part; bending the platform railing to fit the platform.
First I started curving the center part of the railing around a dowel. Try to
match the curve to the radius of the platform attachments. When you have achieved
the correct radius, then you can bend the railing for the arms at about 90 degrees.
Fit is actually perfect -showing how good the patternwork is. Make no mistakes
about it; you will need two tweezers and two steady hands to get it all together
square and level. Add to this the railing and ladders (cut to length and provided
on the sheet and mentioned in the instructions), this is an area of the model
I am quite proud of, and it isn't finished yet. Putting this main director on
the finished model will be like crowning a king/queen/emperor depending which
part of the world you're in. 
Auxiliary director: GMM also provides walkway and railings for the auxiliary
director which are slightly more difficult to position than on the main one
as they are not connected by a central piece. Time, patience and slow setting
super glue will help, and again the fit of the railing to the platform is perfect.
Eduard provides nothing in this area.
Aircraft props and accessories: Both sets provide aircraft props which
requires the spinner to be cut off. To improve the looks, drill out a hole in
the cowling representing the opening for cooling air. This only needs to be
1mm deep. Then, drill a smaller hole in the same centre to attach a piece of
rod to represent the gearbox of the radial engine. Make a spinner from plastic
rod and glue to the etched propeller and finally twist the blades slightly to
a realistic pitch angle.
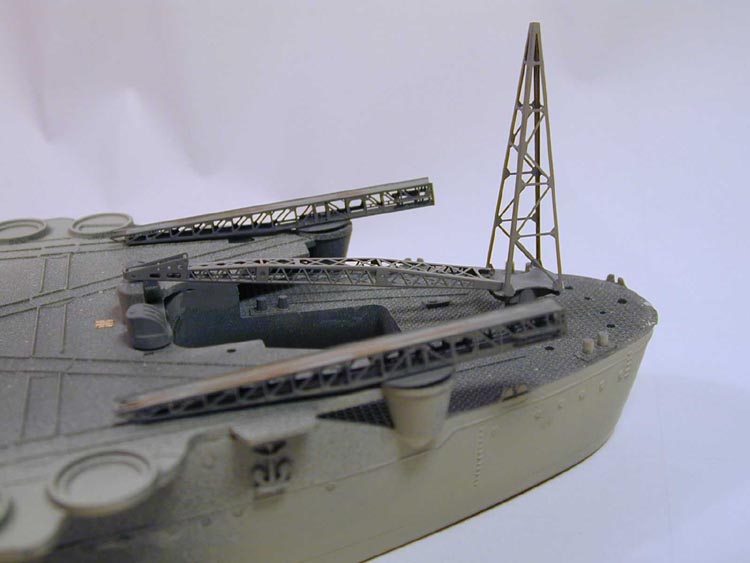
Yardarms: The three yardarms on the rear side of the bridge are dressed
up with railings and wind indicators from the GMM set. Eduard gives you nothing
in this area.
Main turret: GMM provides railings and ladders for the main turrets
and that's it. The ladders will need to be cut to length from the sections provided,
whereas all of Eduard's ladders are provided with the appropriate lengths on
the fret. There are no railings on Eduard's sheet, but they do give the arms
for the outer barrels pointing towards the center one as beautiful etchings.
It's just that I cannot find them fitted in my reference.... The directors for
the turrets suffer from flash and slight mould misalignment and I have spent
a lot of time filling and sanding, taking care not to sand off the oval plates
at the ends. With the Eduard set, I need not have bothered as they are represented
by etchings too. Below each outer gun, there is a platform, and this is finely
etched on Eduard's set, and the platforms for the AA on the turret have a floor
with anti-slip texture. On the rear side on the turret, the door, platform,
rain gutter and ladder is provided.
Secondary battery: GMM provides railings, ladders and blast bag restrainers.
Some of the latter ones will probably say goodbye with a "spoiiiiiiing" when
installing them, so GMM has given some spares whereas Eduard gives you the number
you need. The ladders between the guns are again etched to size on Eduard's
set. The tripod and aerial in the kit requires a careful touch in cleaning up
and it doesn't fit that great either. Eduard has etched a replacement, which
is finely detailed, but this needs something more two-dimensional to look convincing.
Still, the Eduard etching can be used as a template for making one from plastic
rod. The two doors on the rear of the turret are included on the sheet, and
these are very welcome. Eduard has really provided a lot of useful items for
the secondary armament; antislip plate for the front barbette, strengthening
plates for the front and rear, doors, and finely etched grilles which fills
the empty space left by Tamiya in these areas.
Funnel: The unconvincing plastic platform on the searchlight level in
front of the funnel is replaced both on GMM's and Eduard's sheets. GMM includes
a tailor-made railing that fits perfectly requiring only some supports made
from stretched sprue whereas Eduard provides the walkway to the machine gun
control tower. How this will fit to GMM's platform I don't know.... The ladders
on the front leading up to the funnel outlet is included in both sets, but only
GMM provides the funnel cap grilles and the baffle plates.
Railing and bits: GMM gives you a variety of railing, and you get lots
of it too. Judging by the instructions in Eduard's set, you only get enough
to go around the main deck. If you do get more, then the instructions don't
tell you where to put it. You only get three bar railing (including the part
which is glued to the deck), whereas the GMM set gives you five types. What
I found most impressive about the GMM railing is that is really looks like stanchions
connected by chain - the Eduard set looks more like welded steel tubes or taut
wire. Both sets also includes watertight doors for the superstructure and adequate
directions for placement. GMM mentions the presence of ladders on the main mast,
but the ladders will need to be assembled from 5cm sections - not an easy task
to get right for slender structures like these. Add to the fact that the ladders
are wider than the masts themselves, and things will look odd. Also, I am running
out of ladder material already, so buying an extra set of ladders will be useful
here. Eduard gives you ladders etched to length and are much narrower, looking
much more "in tune" with the masts. GMM provides boat pulleys which Eduard does
not, and both sets provide the radio direction finder. GMM has etched a notch
in the circle carried by the mast and you just insert the other circle 90 degrees
to this one. Eduard will have you bend both rings 90 degrees and then glue these
to a mast made from scratch. I think the GMM way may be slightly easier, but
I haven't got that far yet. You do get a spare in case you make a mess of the
first one.
And now; the bits left on Eduard's sheets. There still are a number of parts
left, and the largest ones being the anti-slip plates for the enclosed 12.7cm
high angle gun deck. These will naturally be overscale, but so will the texture
of the anti-slip in the kit. These plates will enhance the rather bare surface
of the steel deck. There are a number of hatches and doors left to fit to the
foundations for the gun directors, the rear side of the enclosed triple 25 mm
turrets, the rear of the bridge together with the ladder and platforms which
replace the solid plastic items and the deck hatches. There is a hatch of some
sorts on the open 12.7cm high angle guns, and this is included too. Also included
are platforms overhanging the hull sides towards the bow and the stern. There
are some details on the breakwater that I do not know what they represent; could
it be rods for cleaning the main guns? Last, but not least are the photoetched
grilles. Tamiya represents the grilles as raised from the superstructure, whereas
they should really be flush, just glue them on the walls carefully to avoid
filling the grilles with glue and don't do what the instructions say. On the
rear deck overhang, the plastic grilles will be enhanced with etched anti-slip
treadplates and grilles. This makes me wonder if this part of the deck should
be see through just like the open metal boarding used on bridges and footpaths
to save weight? If so, milling out the solid plastic and replacing it with the
etching should really give finesse to the finished model. There is a set of
stairs to be fitted on the rear port side, just aft of the openings for the
boats. These openings can be blocked with etched doors which have better detail
than those provided in the kit.
Drawing a conclusion which one to get is up to the individual, but anyone who
can afford it and willing to put in the effort should really buy both sets.
I was quite happy just having the GMM set, and when I bought the Super Illustration,
I found a lot of things missing from the kit, and the Eduard set provides a
lot of those missing things. None of the sets try to change some of the wrong
shapes of the kit. If I just had the Eduard set without seeing the GMM set,
I'd be just as happy. It would be too much to ask of any photoetched set to
provide all items possible, so there must be a compromise. Fortunately in this
case, the two sets contain enough differences to make the purchase of both justifiable.
Links:
Eduard
Gold Medal Models
 compared
to a box structure in the GMM set, but GMM also gives you ten internal braces
for the structure and the pulley and bracket at the front. This complicates
the assembly of the GMM catapult, but fit is really good and it is not as hard
as it seems, resulting in an impressive looking miniature. The breakdown and
reduced number of parts in the Eduard set makes it easier to assemble, but cannot
attain the visual complexity and accuracy of the GMM item. Both sets include
aircraft trolleys and two types of launch cradles.
compared
to a box structure in the GMM set, but GMM also gives you ten internal braces
for the structure and the pulley and bracket at the front. This complicates
the assembly of the GMM catapult, but fit is really good and it is not as hard
as it seems, resulting in an impressive looking miniature. The breakdown and
reduced number of parts in the Eduard set makes it easier to assemble, but cannot
attain the visual complexity and accuracy of the GMM item. Both sets include
aircraft trolleys and two types of launch cradles.