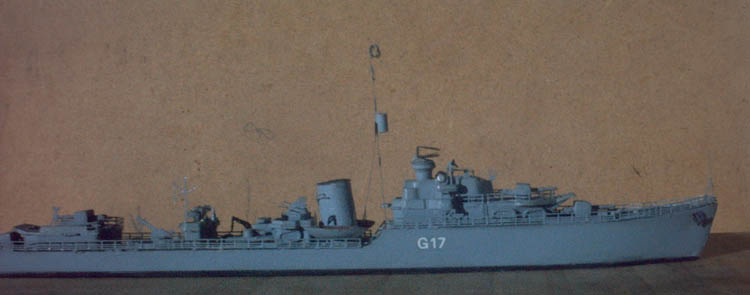
HMS Onslow - Tamiya (Ex Skywave) 1/700
By: Shane Jenkins
The War Emergency Class Destroyers (DD) were conceived in the late 1930s and were constructed under the War Emergency Programme. Considered by some to be the low point in British destroyer design, however firepower and size are only part of what constitutes a good design - seaworthiness and reliability come into the equation as well. As such, they gave sterling service throughout the war and in post war service. HMS Onslow (laid down as HMS Pakenham) is a good example, she saw service in the North Sea and in the Normandy campaign in 1944. She was transferred to Pakistan after the war in 1949 and renamed Tippu Sultan. She was armed with four 4.7 inch Mk.IX guns mounted in four turrets, one 4 inch HA Mk.V AA gun, four Mk.IX 21 inch torpedo tubes on a single Mk.VII mounting, one Mk.VII quadruple pom-pom and 4 2Omm Oerlikons.
The O class destroyer kit was originally done by Skywave back in the late 1970s and Tamiya have done some minor retooling and added some parts for their re-release. Out of the box, the kit builds up as HMS Onslow, however there is a lot of conversion potential in the kit. Any of the War Emergency O-Z class DD's can be made and I particularly look forward to modelling the RAN Q class DD's and possibly a RAN Type 15 ASW Frigate conversion from this kit.
I built HMS Onslow as she appeared, shortly after commissioning. The kit goes together well but there are a few things to be aware of if you are planning to build it straight from the box and more if you plan to use the White Ensign Models (WEM) 0-P photo-etch (PE) set
![]() There
There![]() is a life raft moulded on the deck, in-between where the two gun towers will
go which needs to be removed, this is really supposed to be on a platform added
to the Pom-pom tower. I also removed the small block of plastic from the bridge,
which was never on any O-P class DD, these two instances are a case of the pattern
masters misreading the plans. Before going any further, it must be also noted
that the hull is 2mm short. Now you may want to cut the hull and add a 2mm plug,
I frankly couldn't be bothered for 2mm, so my model is short.
is a life raft moulded on the deck, in-between where the two gun towers will
go which needs to be removed, this is really supposed to be on a platform added
to the Pom-pom tower. I also removed the small block of plastic from the bridge,
which was never on any O-P class DD, these two instances are a case of the pattern
masters misreading the plans. Before going any further, it must be also noted
that the hull is 2mm short. Now you may want to cut the hull and add a 2mm plug,
I frankly couldn't be bothered for 2mm, so my model is short.
I painted her wearing an overall AP507B (Humbrol 145) scheme. While there is some argument as to the existence of a lighter grey on the superstructure, my references don't show this. The decks were painted in a medium dark green (Humbrol 30), the jury still being out as to whether Semtex was dark green or dark grey. I'll leave this conundrum for the modeller to decide about which colour to use. I also painted the steel decks at the bow and stern in AP507C (Humbrol 112). Before painting, I like to hand-paint as much as possible on the sprue and etched set. This was my first error, as I should have assembled the etched pom-poms first and then painted them, but more on that later..
The WEM O-P etched brass set is recommended for experienced users of photo-etch and I second that as the instructions could be clearer and may daunt someone less stubborn than myself. As I was going to be using the photo-etch 4" HA gun and gunplate, you also need to get rid of the kit's gun attachment and gunplate. The photo-etch gunplate then didn't fit in the space left surrounded by the deck mouldings. You can either do what I did, which was to thin them down and file the PE plate until it fits or get rid of the mouldings and replace with plastic card after glueing the plate to the hull. I recommend the latter as it took ages to get it right my way.
Next came the funnel, the instructions say to remove the raised detail from
the funnel cap and then attach the PE grille, I went one step further and hollowed
out the funnel cap completely, painted the inside black and attached the grille
on top. I couldn't quite get the raised "dome" effect, but it looks OK anyway.
After some hassles, I then attached the funnel walkway and ladder ![]() assembly.
A deft touch and dry fitting is needed here. It may be best to attach it to
the funnel to the kit at this stage and then fold the handrails up. The funnel
base can also can be flared out to make it more accurate.
assembly.
A deft touch and dry fitting is needed here. It may be best to attach it to
the funnel to the kit at this stage and then fold the handrails up. The funnel
base can also can be flared out to make it more accurate.
Next we approach the saga of the 4 barrelled pom-poms. This is the part where I manfully defeated the carpet monster at every turn - without putting my back out again. The Mistress would come into the hallowed modelling space and say "not again!!!" and then swiftly retire to the safety of the computer.
To the pom-poms, this consists of 4 parts, which became 6 parts as I went on. My first mistake was to paint them before assembly, this did not help one iota. I folded the mounting ring and then tried to fit the ammo boxes through the slots, because of the extra paint they did not fit properly. As a consequence of trying to fit them ALL in at the same time, the excess bending of the mounting rings caused them to break into three pieces at each fold. This actually made it a bit easier, as I could attempt to fit each gun into it's respective slot. After scraping off the paint, I discovered that I needed to enlarge a couple of holes by a minute amount -this involved the careful use of a No 11 modelling knife and a needle file. After much cursing, swearing and crawling on the floor, I finally got all the guns to fit. My advice here is to paint it after assembly and dry fit the guns to the mounting rings before folding it. I then glued the base of the pom-poms to the tower, & put the actual pom-pom assembly aside to glued on later when the tower was in position.
In between all the joys of photoetch I assembled and attached the fore and aft superstructure. I removed part of the moulded on "railings" in preparation for the new railings, which were added in later. The bridge construction could have been made a bit easier by not having the gun sponsons as one piece going through the bridge. This requires some putty and filing to look good. You also need to add putty to the front of the bridge to make it an even slope. I also removed the "stair pyramids" at the fo'c's'le break by drilling and the filing them down in preparation for the PE stairs.
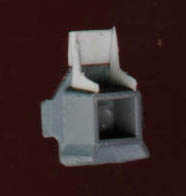
 The
main gunnery radar PE replaces the kit's blob of plastic with a much more realistic
antenna. Consisting of three parts, the base, mounting brackets and the actual
radar. Folding the brackets went ok, one fold is a bit uneven, but it does the
job. I then attached the bracket to the base. Now comes the fun part, doing
a simple fold to the radar. The end result is supposed to look like a cone when
viewed sideways. I had used one of the smallest round objects I had for this
fold, however it ended up with a straight back instead of a rounded one, again
it still looks better than the moulded bit of plastic.
The
main gunnery radar PE replaces the kit's blob of plastic with a much more realistic
antenna. Consisting of three parts, the base, mounting brackets and the actual
radar. Folding the brackets went ok, one fold is a bit uneven, but it does the
job. I then attached the bracket to the base. Now comes the fun part, doing
a simple fold to the radar. The end result is supposed to look like a cone when
viewed sideways. I had used one of the smallest round objects I had for this
fold, however it ended up with a straight back instead of a rounded one, again
it still looks better than the moulded bit of plastic.
Next came a minor error with the main guns as I used the wrong ones thankfully I discovered my mistake but only after trying to file the PE breech blocks to fit. Oh well. For the record use part 11 as this is the right one for HMS Onslow.
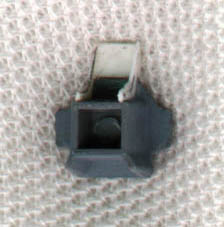
I then started work on the bow and filed away the moulded on anchor chain and drilled out the anchor openings in the hull. If you take the PE anchor chain supplied and give them a twist, whilst holding both ends in tweezers, you can give the illusion of chain.
 Assembling
the 4 2Omm Oerlikons is a nice little project in itself. Each consists of two
parts, the gun and shield, and as there are no instructions for them on the
sheet, I glued one on the wrong way. I then had to check photos to find out
the correct way as it definitely looked wrong. This assembly is very simple,
you just need to take your time with it. They end up looking fairly realistic
for the scale. I also attached the aft boat sponsons from the kit. These really
need to be attached before any painting occurs although it's a pity they are
not covered in the etch set.
Assembling
the 4 2Omm Oerlikons is a nice little project in itself. Each consists of two
parts, the gun and shield, and as there are no instructions for them on the
sheet, I glued one on the wrong way. I then had to check photos to find out
the correct way as it definitely looked wrong. This assembly is very simple,
you just need to take your time with it. They end up looking fairly realistic
for the scale. I also attached the aft boat sponsons from the kit. These really
need to be attached before any painting occurs although it's a pity they are
not covered in the etch set.
I next attacked the HA gun. This comes in three parts - the baseplate, footplate
and gun. The gun assembly is a "simple" fold on itself. You need to be very
careful here, as your fold needs to be in the exact spot, a very slight error
is noticeable. As you may have guessed by now, my fold was slightly out. When
it was glued using superglue (CA), some delicate filing was required on the
gun, this unfortunately had the result of the gun becoming unstuck. After reglueing
the gun back together this had the unexpected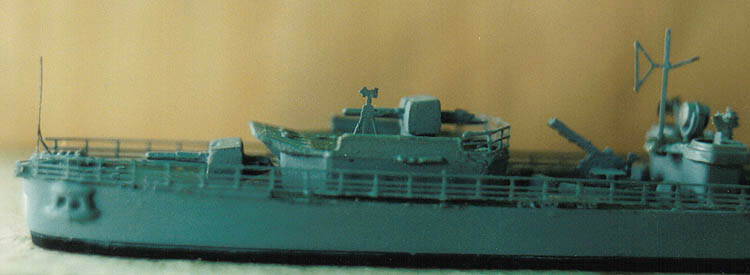 benefit of adding some body to the barrel after painting. Having learned my
lesson from the pompoms, I carefully tried to dryfit the gun to the baseplate.
Alas there was no slot (as per the instruction sheet) in the baseplate on my
part. So I had to slowly make a slot big enough for the gun to fit in using
a No 11 blade to pierce the baseplate and slowing enlarging the slot with a
needle file. Once this was done to my satisfaction, I glued the baseplate to
the hull and attached the gun.
benefit of adding some body to the barrel after painting. Having learned my
lesson from the pompoms, I carefully tried to dryfit the gun to the baseplate.
Alas there was no slot (as per the instruction sheet) in the baseplate on my
part. So I had to slowly make a slot big enough for the gun to fit in using
a No 11 blade to pierce the baseplate and slowing enlarging the slot with a
needle file. Once this was done to my satisfaction, I glued the baseplate to
the hull and attached the gun.
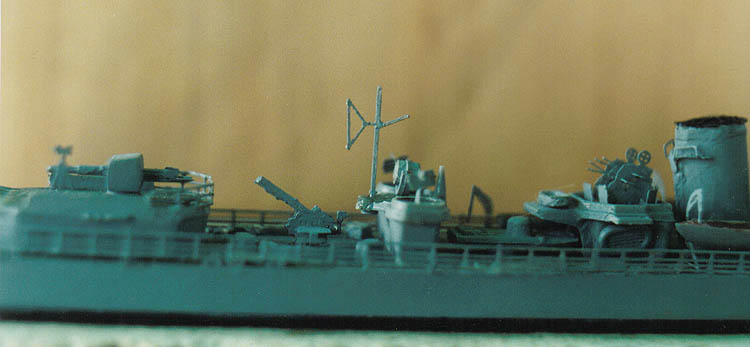
Before attaching the bridge to the forward superstructure, you will need to attach the 2Omm Oerlikons in their respective sponson. The bridge went on easily and I could turn my attention to the Pom-pom platform. This needs some scratchbuilt additions to make it more accurate. As mentioned earlier, you need to remove the moulded on liferaft on the hull. Scratchbuild a life raft platform which goes on the stern side of the Pom-pom platform. This is a relatively easy job, as the accompanying photos show. I then raided my 1/700 kits and liberated a WEM resin liferaft for the platform.
 |
 |
 |
I finally turned to the PE railings for the forward and rear superstructure. I worked out the lengths required and after some careful folding and dryfitting to match the bends, I was satisfied with it. When attaching them though, two dut of three went on fine but the third was almost on when I found out I hadn't left enough room for the ladder opening. I should add here, that it's far better to add the ladders when you're building the forward superstructure, than at this point. After some fiddling about, I was satisfied with the final result. I then added in the bridge windscreen PE. This requires two 90 degree folds and a couple of attempts to get it right even after dryfitting.
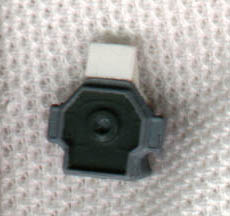
The tripod mast assembly comes in 5 parts (including the 286 radar). Apart from the instructions for the radar, you have to work it out for yourself I first attached the cross arms in the upper 1/3 of the mast, with the smaller one nearer the top. I then assembled the 286 radar, this requires three 90 degree folds and then you glue it together. There's a small gap on my 286 but I glued the 286 to the mast and again I'm happy with the end result.

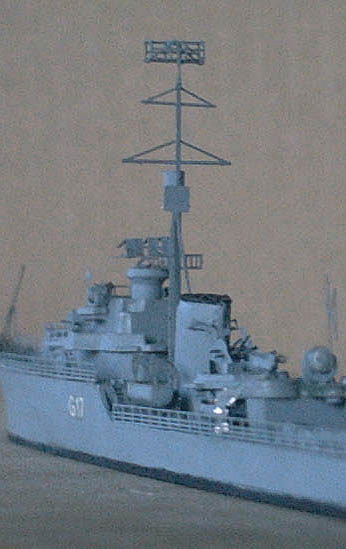 A
dry fit of the mast and mast support showed that the main mast hole on the kit
needed filling. At the same time, I looked at the other holes on the kit for
parts that were going to be replaced and decided that they all needed filling.
This I did with CA, sanded back and repainted. This should be done much earlier
than I did it, to avoid later hassles. Having done this, I then attached the
main mast first with CA, making sure I got the right angle while the CA was
setting. You only have a very short time for this (depending on the CA you use),
so be quick. I then attached the mast support. Since I couldn't discern any
way to have a crows nest at the time, I left it out, but some small plastic
tubing should do the job for that (Whilst taking photos there was an accident
which sent Onlsow back into refit, when she finally emerged, I had added a crow's
nest to the tripod mast from 2mm brass tubing, it's a tad oversize but does
the job).. I also left out the small housing at the base of the mast against
the Fo'c's'le break as well, which would be another minor scratchbuild project.
A
dry fit of the mast and mast support showed that the main mast hole on the kit
needed filling. At the same time, I looked at the other holes on the kit for
parts that were going to be replaced and decided that they all needed filling.
This I did with CA, sanded back and repainted. This should be done much earlier
than I did it, to avoid later hassles. Having done this, I then attached the
main mast first with CA, making sure I got the right angle while the CA was
setting. You only have a very short time for this (depending on the CA you use),
so be quick. I then attached the mast support. Since I couldn't discern any
way to have a crows nest at the time, I left it out, but some small plastic
tubing should do the job for that (Whilst taking photos there was an accident
which sent Onlsow back into refit, when she finally emerged, I had added a crow's
nest to the tripod mast from 2mm brass tubing, it's a tad oversize but does
the job).. I also left out the small housing at the base of the mast against
the Fo'c's'le break as well, which would be another minor scratchbuild project.
I also attached the depth charge covers and the bridge sponson support struts. The support struts were fairly easy to attach, you just need some care in doing so. The depth charge covers really add life to the stern and are also easy to fit, only requiring two folds.
Next up was all the assorted PE around the life boats and torpedo launcher. I attached the kit torpedo launcher first, as it was the easiest. I then decided to add the PE chocks to the small launch. Since I didn't know which ones to use, I used the larger ones and attached them to the launch. A better way would be to attach them to the deck first. I then filed away the deck mouldings and repainted yet again!!
I turned my attention to the life boat supports -now these look very flimsy and unable to support the kit's boats, but appearances can be deceiving -they are strong enough for the job. Make sure that when attaching them, you compare the lengths between the holes in the boats. This is a relatively easy job to attach, with the only fiddly bit being the boats. Next up was the Pom-pom tower, which went on with no filler required, as did the Emergency conning tower. I attached the torpedo loading davit in place of part AlO and put the searchlights on the conning tower. I then went and attached all the following PE pieces: Compass and Peloras on the bridge, Stovepipe on the aft superstructure in place of part 24, Remaining 2Omm Oerlikons on the aft conning tower, along with the aft mast and yardarm in place of part 19, Semaphores on either side of the bridge, along with the kit searchlights, DF loop on the front of the bridge, Pompom sub assembly on the pom-pom tower.
Had I stopped here I would have been very happy with my work, but I thought I'd better add the rest of the railings to finish the model off. The main deck railings come in just the right lengths, so I only needed to put four lengths on - should be an easy job, shouldn't it. Well we're talking about me here.
I tackled the front railings first, since I figured they were shorter and only needed a simple bend for the bow upsweep. After several test fits when they went on with no hassles, I decided to add CA. This I did along the whole length, figuring that since they had gone on fine without it, it should be OK. Well, the modelling gods must have looked down and decided to have a bit of fun. As soon as I put the glue on, do you think I could get them on the way I wanted? After much more cursing and swearing they were on to my satisfaction. Not perfect by a long shot, but much improved from my first attempt at PE railings. I then attached the jackstaff, which after a few attempts started to look a wee bit bent. I fixed this as best as I could, but the end result can be seen in the photos.
![]() You'd
think after the above fiasco I'd learn about applying PE railings in one hit.
Nope, I tried it again. "It's one long straight level piece, with a small bend
at the end, maybe it'll work out better this time". Well, it did go on slightly
better, but not as good as if I'd done it a piece at a time. To compound the
problem, one side decided to be a real pain and had to be taken off completely.
When I was scraping off the CA, I inadvertently put a nice bow in the railing
which I couldn't quite get out. Eventually it went on to my satisfaction, even
if there are gaps in it. I then attached the flagmast to the stern.
You'd
think after the above fiasco I'd learn about applying PE railings in one hit.
Nope, I tried it again. "It's one long straight level piece, with a small bend
at the end, maybe it'll work out better this time". Well, it did go on slightly
better, but not as good as if I'd done it a piece at a time. To compound the
problem, one side decided to be a real pain and had to be taken off completely.
When I was scraping off the CA, I inadvertently put a nice bow in the railing
which I couldn't quite get out. Eventually it went on to my satisfaction, even
if there are gaps in it. I then attached the flagmast to the stern.
Since I'd been handling the kit a bit, some paint had come off the hull & some touchups needed to be done. Now I should've done this job before attaching the railings as due to the stern section of the Onslow being fairly low, I inadvertently caused the railings to come off again. More practice in putting railings on. I finished painting the hull and applied the hull number decals of HMS Onslow (G 17) on each side and the stern. I didn't apply the RN White Ensign decals supplied by Tamiya, as they were designed to fit around the original kit part and not the replacement PE masts. This means you have to trim the decal where the fold is and this may not even work. I decided this wasn't for me, and left the ensigns off. My advice here would be to find another decal that's designed for PE flagmasts from the various aftermarket companies.
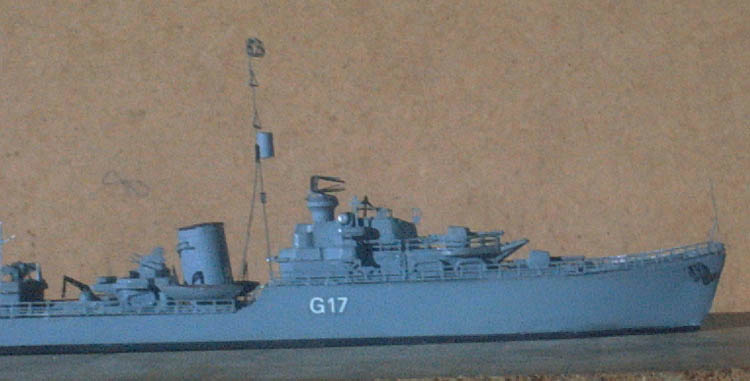 Skywave
has made a nice kit that looks like the Onslow OOB and with a very few modifications
will be more accurate. The kit instruction sheet could be a bit clearer, but
that may just be my copy. This is one kit that really needs a base or something
to hold it with during construction, because of the size of the kit. The photo-etch
set is excellent, slightly let down by the instructions or lack thereof. If
the instructions were more complete this set would be even better for PE novices.
I know I certainly learned a lot from it. The main hassle is finding enough
references to make up for the lack of clear instructions in this case. I was
lucky to have been able to obtain some from fellow modellers. Make sure you
plan in advance how you're going to attack the kit, this will save much time
later on in filling, etc.
Skywave
has made a nice kit that looks like the Onslow OOB and with a very few modifications
will be more accurate. The kit instruction sheet could be a bit clearer, but
that may just be my copy. This is one kit that really needs a base or something
to hold it with during construction, because of the size of the kit. The photo-etch
set is excellent, slightly let down by the instructions or lack thereof. If
the instructions were more complete this set would be even better for PE novices.
I know I certainly learned a lot from it. The main hassle is finding enough
references to make up for the lack of clear instructions in this case. I was
lucky to have been able to obtain some from fellow modellers. Make sure you
plan in advance how you're going to attack the kit, this will save much time
later on in filling, etc.
I can recommend this PE set for people who have built a few kits out of the box, are satisfied with their modelling skills and wish to improve on them by going down the PE path. Sure you might make a bit of a mess like I did, but at the end, you'll have hopefully improved your skill level and be ready for the next challenge. It's a relatively cheap set, so buying two may be an option if you don't fare so well with the first set and it does give you the option of building an 0 or P class DD. If you're experienced in PE, buy it - you won't be disappointed. WEM & their designer Peter Hall have done an excellent job.
I'd like to thank the following who helped me with this project:
Ken Hagerup - who supplied me with Alan Raven's Ensign on the War Emergency
DDs
Peter Hall - who graciously gave me some extra info on the PE fret.
Chris Drage - who first encouraged me to do the project
Tim Stoneman - for his notes on the 0 class
And other SMML listmembers (too many to list here) who also gave me info & helped
out with queries
References:
Raven Alan - Ensign No 6 War Built Destroyers o to Z Classes
Raven Alan - Plastic Ship Modeller 97/1 The development ofNaval Camouflage 1914-45
Pt 3 British camouflage in WW2
Raven Alan - Plastic Ship Modeller 97/2 Letters page
Colour scheme from the WEM HMS Cossack kit as a guide.
Warship No 4 - Photospread on the 0 & P class DD
Richards Nat and Gertner Larry - Destroyers War Emergency Type IPMS (USA) Quarterly
Vol 18, No 4
STOP PRESS: After receiving Alan Raven's latest series on RN camouflage, he states in reference to deck colours that "unless otherwise stated it's to be assumed they were done in pre-war colours Semtex - tan". So again, you need to check your own reference sources.
The above article was first published in the APMA Magazine issue 03/01 and is reprinted here courtesy of the author and APMA Editor
Copyright © SMML 2002